
As a Shopify expert, I often see merchants spending their Sunday afternoons manually dragging and dropping products in the backend of their stores. It is a soul-crushing task that is the digital equivalent of watching paint dry, only with more clicking. Most store owners are seeking a way to keep their storefronts fresh without becoming a slave to the Shopify admin panel. This is where automated collection sorting enters the chat.
If your best-sellers are buried on page three and your out-of-stock items are greeting customers on the homepage, you are leaving money on the table. Conversion rate optimization is not just about changing button colors. It is about ensuring the right product is in front of the right person at the exact moment they are ready to buy. When you automate this process, you transition from being a manual laborer to a strategic growth lead.
Why Automated Sorting is the Secret Sauce of Conversion Rate Optimization
Before we dive into the how, we must understand the why. Many merchants view collection sorting as a minor aesthetic choice, but it is actually a critical component of your ecommerce maintenance services. A well-sorted collection reduces friction and guides the customer toward a purchase.
Key Benefits of Automating Your Collections
- Improved User Experience: Customers find what they want faster when high-intent products are prioritized.
- Reduced Manual Error: No more forgetting to hide a seasonal product after the holiday ends.
- Dynamic Visual Merchandising: Your store updates in real-time based on inventory levels and sales data.
- Increased Average Order Value: By strategically placing high-margin items or complementary products, you encourage larger carts.
- Hands-Off Management: You can set the rules once and let the system handle the heavy lifting while you focus on scaling.
Mastering the Draft Helper for Seamless Launches
One of the biggest headaches in shopify store setup is managing the transition from "coming soon" to "available now." I often work with brands that stay up until midnight just to click a button and publish a new collection. This is not sustainable and it is certainly not fun.
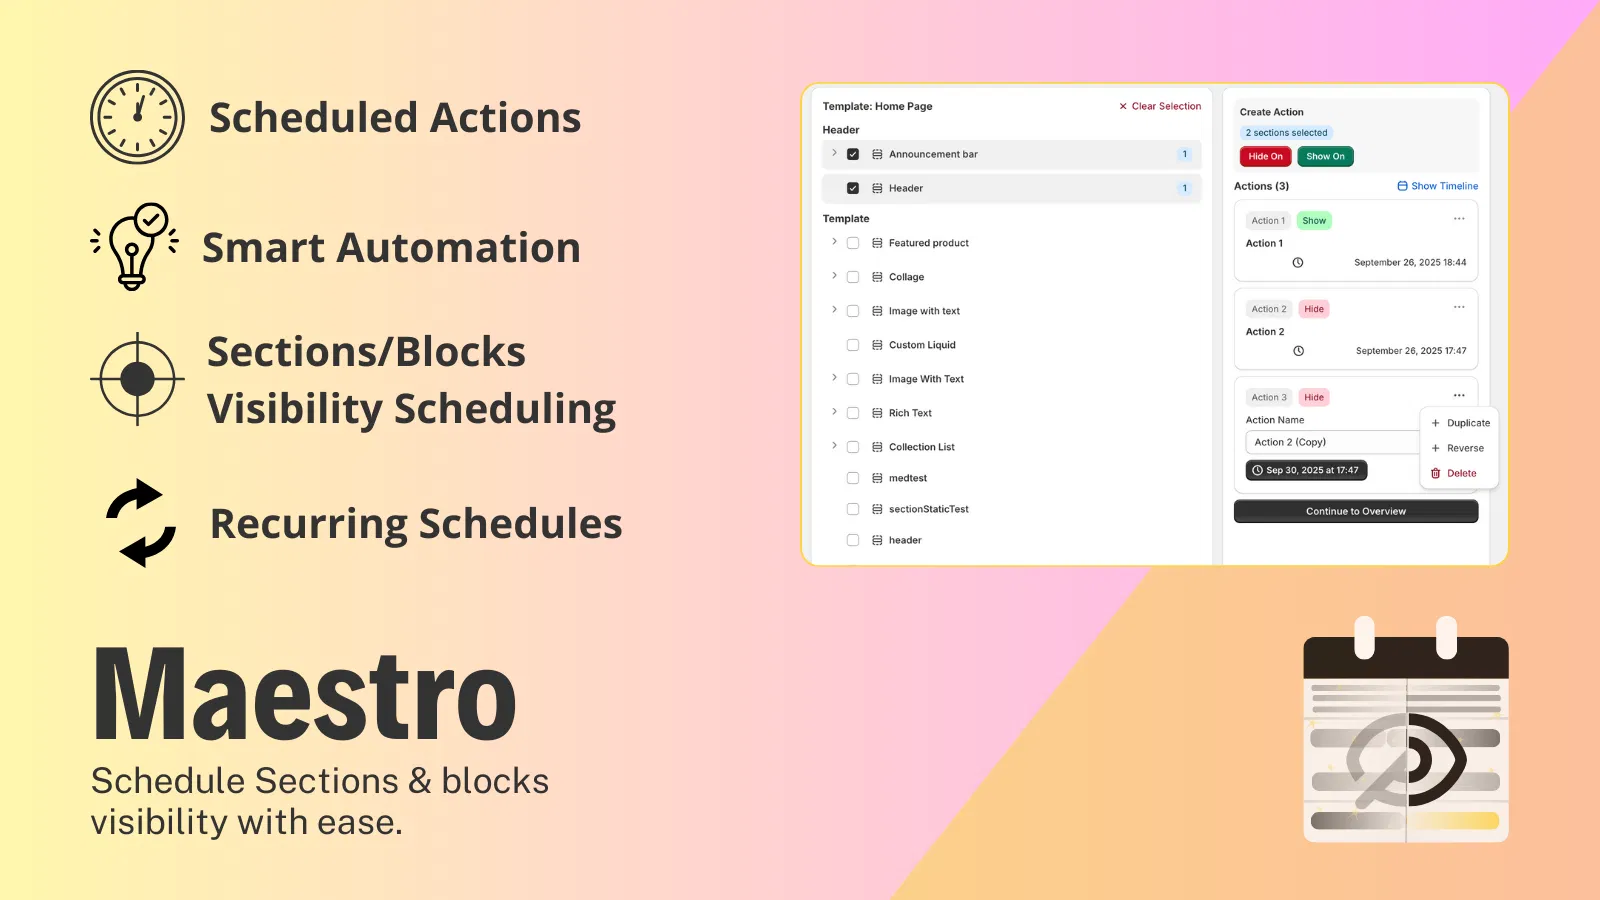
The Draft Helper feature in the Product Scheduler by Maestro app acts as your digital assistant. It allows you to prepare your product launches in a draft state and schedule them to go live at a specific second.
Step 1: Prepare Your Assets
Ensure your product descriptions, images, and SEO tags are finalized in the draft phase.
Step 2: Set the Visibility Timeline
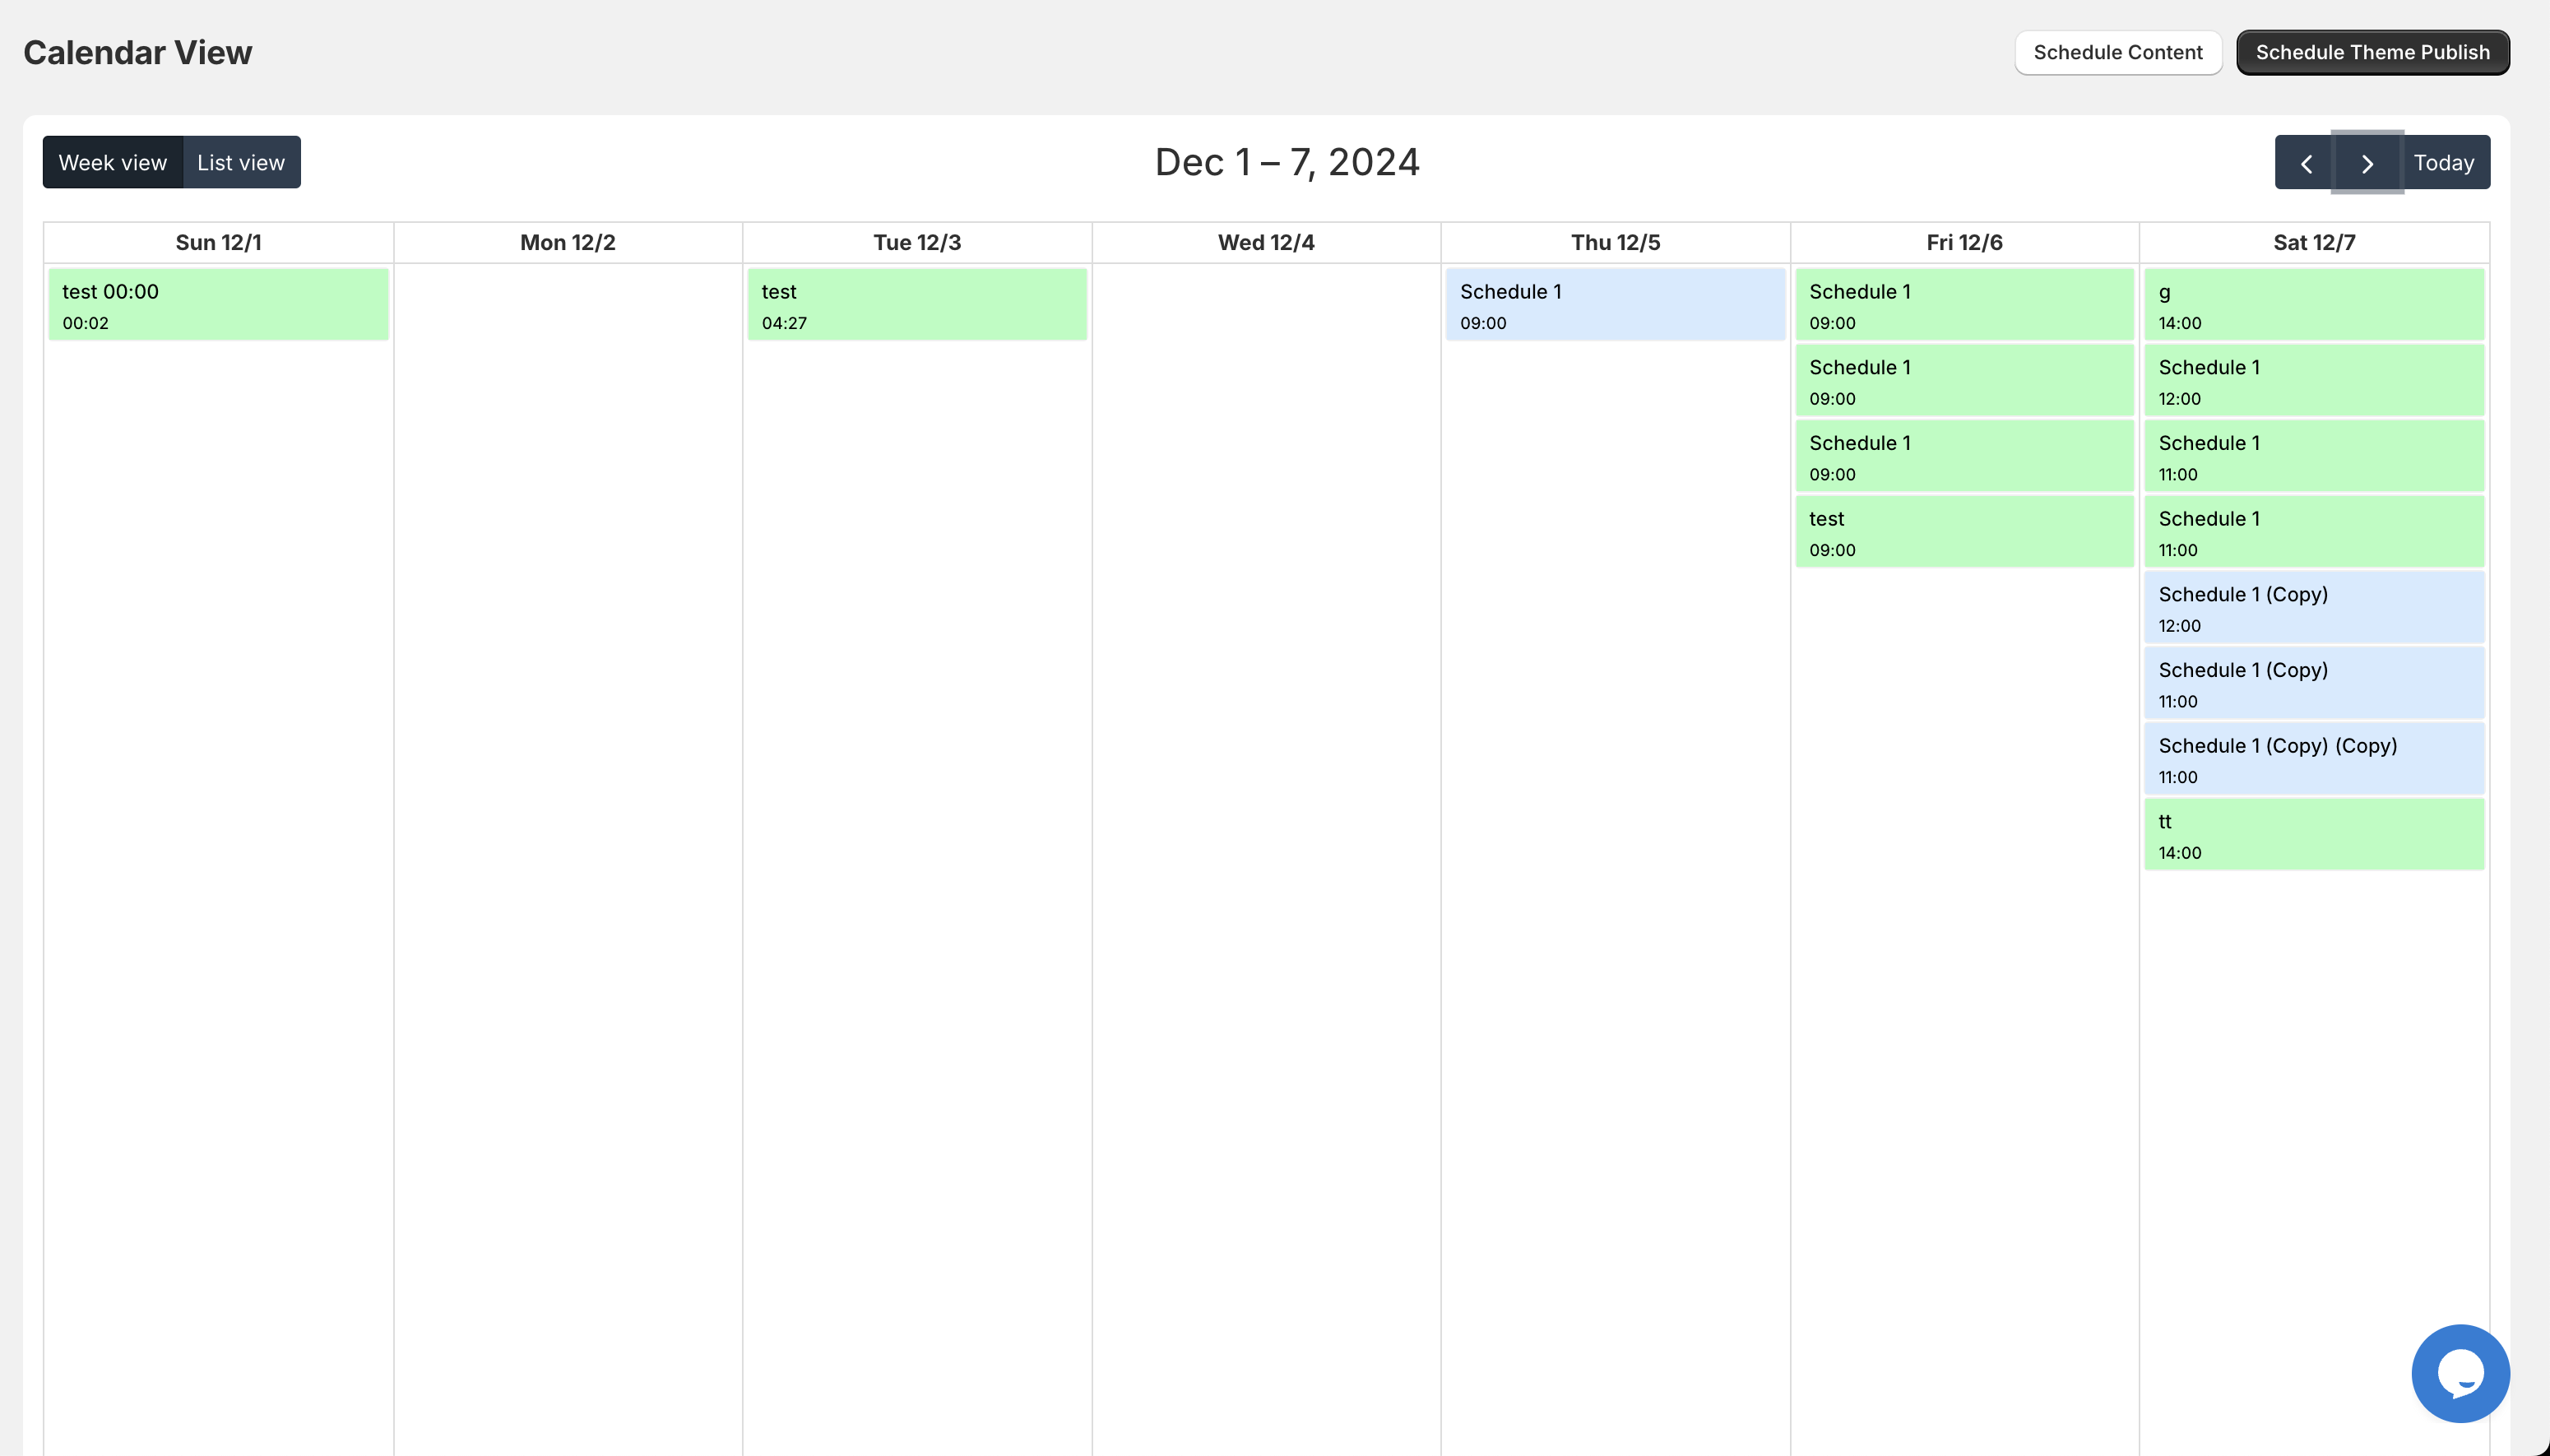
Navigate to the Product Scheduler and select the specific date and time for the launch. This ensures that your collection visibility is managed without you needing to be at your desk.
Step 3: Coordinate with Marketing
Since the launch is automated, you can schedule your email marketing and social media posts to go out at the exact same time the products appear. This creates a cohesive brand experience that significantly boosts conversion rate optimization.
Automated Tag Management for Seasonal Success
Seasonal sales are the lifeblood of ecommerce, but they are also the source of most maintenance nightmares. Manually adding "Sale" tags to hundreds of items is a recipe for carpal tunnel syndrome.
As a Shopify expert, I recommend using automated tag management to handle your seasonal rotations. By using the Product Scheduler by Maestro, you can schedule tags to be added or removed based on specific dates.
- Pre-event tagging: Add "Black Friday" tags to products a week before the sale begins so your smart collections are ready to go.
- Post-event cleanup: Set a rule to remove "Clearance" tags once the inventory hits a certain threshold or the date expires.
- Dynamic filtering: Automated tags feed into your storefront filters, allowing customers to sort by current promotions instantly.

Scheduling Price Changes and Rounding Rules
Nothing kills a conversion faster than a price that looks messy. If your automated discounts result in a price like $19.34, it can look unprofessional. Professional merchants know that psychological pricing, such as ending in .99 or .95, is vital for trust.
The Product Scheduler by Maestro allows you to schedule price changes across entire collections. This is particularly useful for flash sales or price increases due to supply chain shifts.
How to Implement Rounding Rules
- Select Your Collection: Choose the group of products that need a price adjustment.
- Define the Change: Set a percentage or fixed amount discount.
- Apply Rounding: Use the app to ensure all new prices round to your preferred decimal point.
- Set the Expiry: Schedule the prices to revert to their original state once the promotion ends.
This level of precision is what separates hobbyist stores from professional brands. It ensures that your pricing strategy is always executed perfectly.

Inventory Automation: The End of "Sold Out" Clutter
There is nothing more frustrating for a shopper than clicking into a beautiful collection only to find that the first ten items are out of stock. This is a conversion killer. Proper ecommerce maintenance services include a strategy for handling inventory-based sorting.
Automated collection sorting can be configured to push out-of-stock items to the very bottom of the page. This keeps your "available" products front and center.
- Real-time updates: As soon as an item is restocked, it jumps back to its designated position.
- Customer satisfaction: Users see what they can actually buy, reducing bounce rates.
- SEO benefits: You keep the product page live for SEO purposes, but it does not clutter the high-converting real estate of your collection pages.
Managing Collection Visibility and Sorting with Maestro
Managing a store involves more than just listing items. It involves curation. The Product Scheduler by Maestro provides a comprehensive roadmap for theme and content management. Whether you are dealing with migration to shopify or optimizing an existing store, visibility scheduling is a game changer.
As your business grows, your collection list will likely become bloated. Using the scheduling features, you can hide entire collections during the off-season. For example, if you sell swimwear, you can schedule your "Summer Essentials" collection to hide in October and reappear in March.
Step-by-Step Visibility Setup
- Open the Maestro App: Navigate to the visibility settings.
- Select the Collection or Section: Choose the specific area of the store you want to control.
- Create a Recurring Schedule: For seasonal events, set a recurring rule that repeats every year.
- Review the Timeline: Use the visual timeline feature to ensure no overlaps or gaps in your storefront presentation.
Reducing Human Error with Automation
The most expensive part of any business is human error. A typo in a price or a forgotten "unpublish" button can cost thousands in lost revenue or customer service headaches. By shifting to a hands-off store model using the Maestro app, you mitigate these risks.
Automation provides a "set it and forget it" peace of mind. Once you have built your logic, the system follows it with robotic precision. This is a proactive step in your growth strategies because it frees up your team to focus on high-level creative and marketing tasks.
The Role of a Shopify Expert in Automation
While apps like Maestro make the process easy, setting up the initial logic requires a strategic approach. I often help merchants define their sorting priorities. Should you sort by best-selling? Highest margin? Newest arrival? Usually, a hybrid approach works best, and automation allows you to test these different strategies to see which one drives the best conversion rate optimization.

Conclusion: Taking Control of Your Storefront
Automated collection sorting is not just a luxury for big brands. It is a vital step for any merchant looking to scale. By using tools like the Product Scheduler by Maestro, you ensure that your store remains dynamic, relevant, and optimized for sales at all times.
From managing draft launches to automating seasonal tags and cleaning up out-of-stock clutter, the benefits are clear. You save time, reduce errors, and most importantly, you provide a better experience for your customers.
If you are ready to take your shopify store setup to the next level and want to stop manual sorting forever, now is the time to embrace automation. You can book a meeting with our team to discuss how to implement these strategies, or check out our FAQs for more information on how we support merchants like you.
Your store should work for you, not the other way around. Let automation handle the repetitive tasks so you can get back to the work that actually grows your brand.