
As a Shopify expert, I often see merchants struggling with the manual labor of store management. You are likely seeking a way to automate your site updates so you do not have to stay up until midnight just to swap a hero banner for a flash sale. The traditional way of managing Shopify themes requires constant manual intervention, which is neither scalable nor fun.
If you are looking to reclaim your time while maintaining a dynamic storefront, scheduling your theme sections is the ultimate power-up. In this guide, I will show you how to use the Maestro Theme Scheduler to automate your visibility settings in five minutes or less.
The Problem With Manual Theme Management
Most store owners are seeking a "set it and forget it" workflow, but they often end up chained to their Shopify admin. When you launch a promotion, you usually have to log in exactly when the sale starts to enable a section and log back in the second it ends to hide it. This manual process is prone to human error and limits your ability to scale operations.
By automating these changes, you can achieve:
- Greater operational efficiency by planning weeks of content in one sitting.
- Improved conversion rate optimization by ensuring promotional content is always relevant.
- Better work-life balance by avoiding late-night or weekend site updates.
- Seamless brand consistency across different time zones.
Why Scheduling is Vital for Growth
Before we dive into the how, let us talk about the why. Managing custom Shopify themes effectively is not just about aesthetics; it is about performance. A store that stays static for too long becomes stale. Conversely, a store that updates its sections to reflect current trends, holidays, and stock levels sees higher engagement.
Using tools like the Maestro Theme Scheduler allows you to treat your homepage like a programmed media channel. You can schedule a "Free Shipping" bar to appear only on weekends or set a "Limited Edition" collection block to vanish precisely when the stock is expected to run out. This level of precision is what separates high-growth brands from the rest.
Step 1: Install and Connect Your Theme
The first step is ensuring your app is ready to talk to your theme. Navigate to your Shopify admin and open the Maestro app. If you have not installed it yet, you can find it through our dedicated Maestro Theme Scheduler page.
Once the app is open, follow these instructions:
- Select your active theme from the dropdown menu within the app dashboard.
- Authorize the app to make visibility changes to your theme sections.
- Verify the connection by checking if your current sections are listed in the app interface.
Shopify will guide you through the initial permissions. This is a standard process for any app that interacts with your theme liquid or JSON files.
Step 2: Identify the Section to Schedule
Open your Shopify Theme Editor in a separate tab to identify exactly which section you want to control. Whether it is a rich text block, a featured collection, or a video hero, every section in a modern OS 2.0 theme has a unique ID.

When choosing a section, consider these common use cases:
- Announcements bars for time-sensitive shipping updates.
- Countdown timers that should disappear once the clock hits zero.
- Promotional banners for seasonal sales like Black Friday or Valentine's Day.
- Trust badges that you might only want to show during high-traffic launch windows.
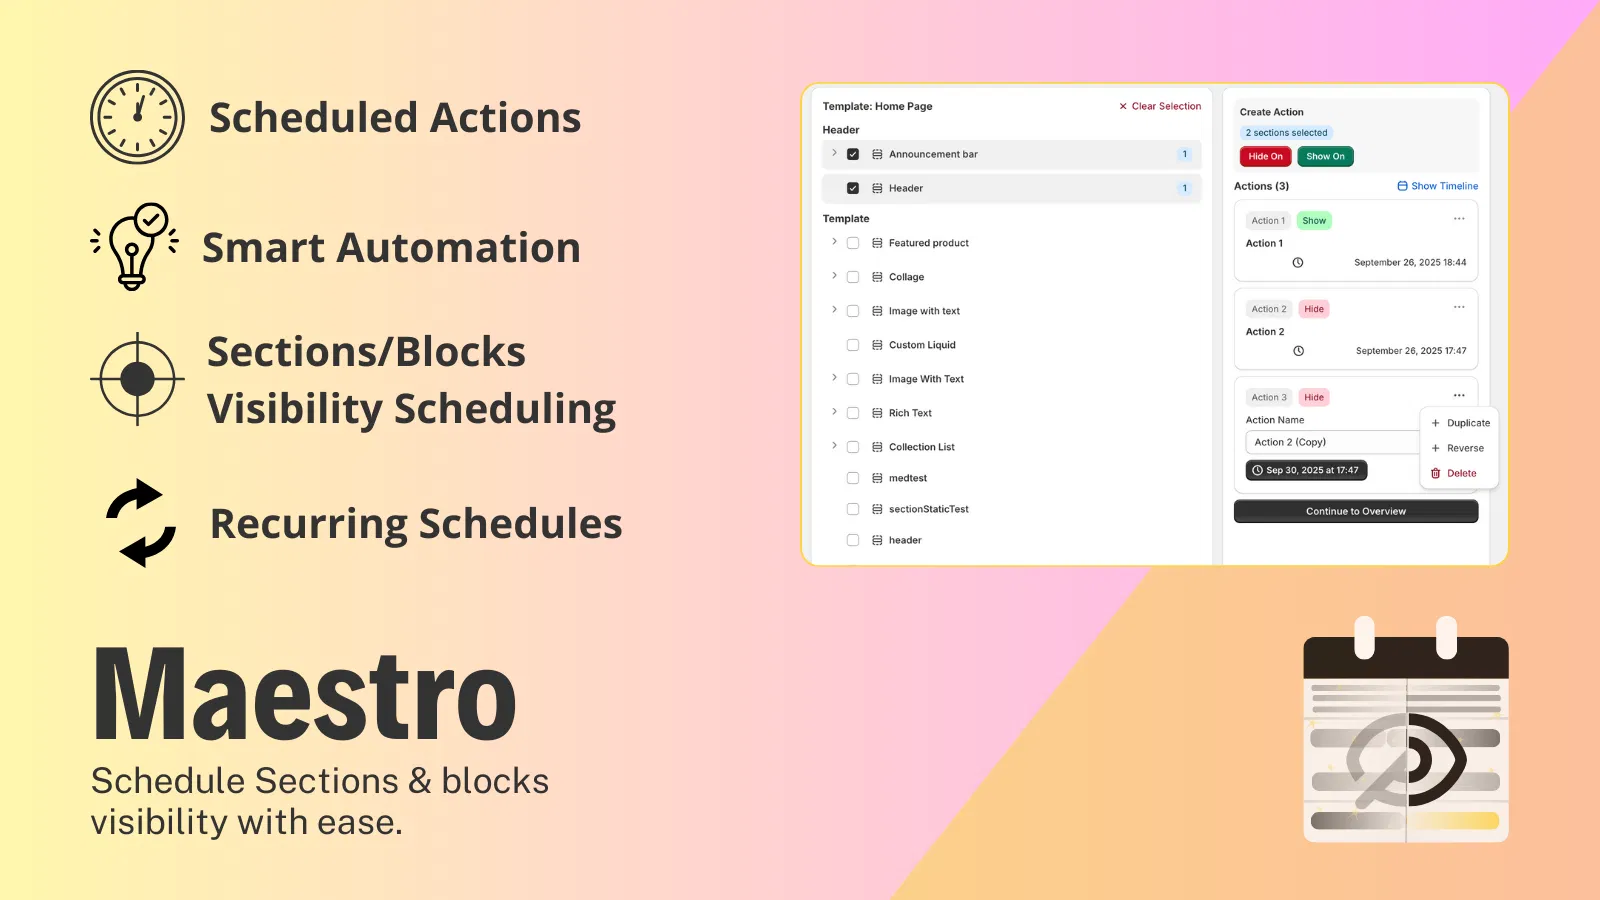
Step 3: Create Your First Scheduled Action
Now, return to the Maestro app. Click on the "Create New Action" button. This is where the magic happens. You are essentially telling the app, "At this specific time, change the visibility of this specific block."
Follow these simple steps:
- Name your action clearly, such as "Summer Sale Banner - Go Live."
- Choose the action type, which in this case will be "Show Section."
- Select the section from the list that matches the one you identified in the theme editor.
- Set the start date and time. Ensure you select the correct time zone to avoid premature launches.
Step 4: Define the Expiry (The "Hide" Action)
A schedule is only half complete if you do not set an end time. One of the biggest mistakes in shopify store setup is leaving "Sale" banners up long after the sale has ended. This hurts brand authenticity and confuses customers.
To prevent this:
- Add an end action within the same scheduling window.
- Select "Hide Section" as the resulting action.
- Pick the date and time the promotion officially ends.
- Save the configuration to add it to your timeline.
After completing these steps, you will see a visual representation of the scheduled task in your app dashboard.

Step 5: Test and Verify
As a Shopify expert, I never trust a change until I see it in a "preview" state. Maestro allows you to see what is coming up in your queue.
- Check the timeline view to ensure the actions are in the correct order.
- Use the preview function if available to see how the theme will look once the section is triggered.
- Confirm your theme settings in the Shopify editor have the section "hidden" by default if the schedule is meant to turn it "on" later.
Once you are satisfied, hit "Enable." Your store is now running on autopilot.
Maximizing Impact with Custom Shopify Themes
If you are using a highly customized theme or a headless build, you might wonder if this works for you. Maestro is designed to work seamlessly with Shopify's section architecture. For those looking to go deeper into store optimization, I highly recommend checking out our optimization audit report to see how scheduled content fits into your overall UX strategy.
The beauty of scheduling is that it allows for complex layering. You can schedule multiple sections to toggle at once, completely transforming the look of your home page for a specific event without touching a single line of code during the event itself.

Tips for Success
To get the most out of your 5-minute setup, keep these tips in mind:
- Group your actions. If you have five sections for a sale, name them with the same prefix so they are easy to find.
- Watch your time zones. Always double-check if your store time is set to EST, PST, or UTC.
- Keep it minimalist. Do not over-schedule to the point of confusion. Start with one or two key sections and build from there.
- Monitor your performance. Use Shopify analytics to see if the scheduled changes correlate with spikes in conversion rate optimization.
If you ever feel overwhelmed, remember that XCO Agency is here to help with professional e-commerce development and digital marketing support. We specialize in taking the technical weight off your shoulders so you can focus on brand growth.
Beyond Simple Sections: What is Next?
Scheduling sections is just the beginning. Once you master this 5-minute workflow, you can begin exploring Shopify Flow integrations and advanced automation. For example, you can trigger theme changes based on inventory levels or customer tags.
We have a wealth of resources for those looking to expand their Shopify knowledge. You might find it useful to learn how to add a featured collection to your home page or even how to perfectly set up your domain to ensure your store's foundation is rock solid before you start automating.
Conclusion
Scheduling your first theme section is a vital step toward professionalizing your store management. By following the simple steps of installing Maestro, identifying your sections, and setting your start/end times, you move away from reactive "firefighting" and toward proactive campaign planning.
This 5-minute investment will save you hours of manual labor in the long run. It ensures your store is always fresh, your promotions are always timely, and your conversion rates are always optimized.
If you are ready to take your store to the next level, start by scheduling your first banner today. You can explore more of our tools and services at XCO Agency or dive straight into the Maestro app to begin your automation journey.
