
As a Shopify expert, I often work with merchants who describe their product launch nights as a caffeine-fueled nightmare. Picture this: it is 11:58 PM on a Thursday. You are hovering over your laptop, frantically refreshing the Shopify admin page, waiting for the clock to strike midnight so you can manually toggle fifty products from draft to active. One wrong click and your premium collection is live without the correct "New Arrival" tags, or worse, the pricing is still set to your wholesale cost.
If this sounds like your typical Friday morning, you are working much harder than you need to. Many store owners seek a way to automate these tedious tasks to ensure a professional, error-free launch while they are actually sleeping. This is where high-level shopify store setup strategies come into play, specifically focusing on automation tools that handle the heavy lifting for you.
By integrating the right automation workflows, you can achieve several key benefits:
- Eliminate Human Error: Automation removes the risk of forgetting to update a price or a tag during the stress of a live launch.
- Enhance Operational Efficiency: You can set up your entire weekly or monthly marketing calendar in one sitting.
- Improve Customer Experience: Products appear exactly when promised, with accurate badges and sorted correctly in their collections.
- Boost Conversion Rate Optimization: Timely launches and perfectly managed sales tiers ensure your customers see the most relevant products at the right price points.
Here are the simple steps to take your store from manual chaos to a fully automated, hands-off machine using the Product Scheduler by Maestro app.
Step 1: Utilize the Draft Helper for Seamless Transitions
The first step in any successful launch is ensuring your products are ready but hidden. Most merchants leave products in "Draft" mode while they finalize descriptions and images. However, the manual flip from "Draft" to "Active" is the most common point of failure for unoptimized stores.

As part of a professional shopify store setup, you should use the "Draft Helper" feature to bridge the gap between preparation and publication.
- Navigate to the Product Scheduler: Open your Maestro app inside the Shopify admin and select the products intended for the launch.
- Select the Draft Helper Action: Choose the action that transitions product status from "Draft" to "Active."
- Set Your Launch Timestamp: Choose the exact date and time, down to the minute, when the products should become visible to the public.
- Confirm Global Visibility: Ensure that the schedule also includes your various sales channels, such as Facebook, Instagram, or the Point of Sale system, so your launch is synchronized across all platforms.
By using this method, you ensure that no customer accidentally finds a "Work in Progress" page. The transition is instantaneous and happens in the background while you focus on higher-level strategy or, ideally, enjoy a full night of sleep.
Step 2: Automate Tag Management for Seasonal Merchandising
Tags are the unsung heroes of Shopify organization. They drive your filters, automate your collections, and often trigger specific "Sale" or "New" badges on your theme. Manually adding "Summer Sale" tags to five hundred items is not a job for a human; it is a job for a machine.
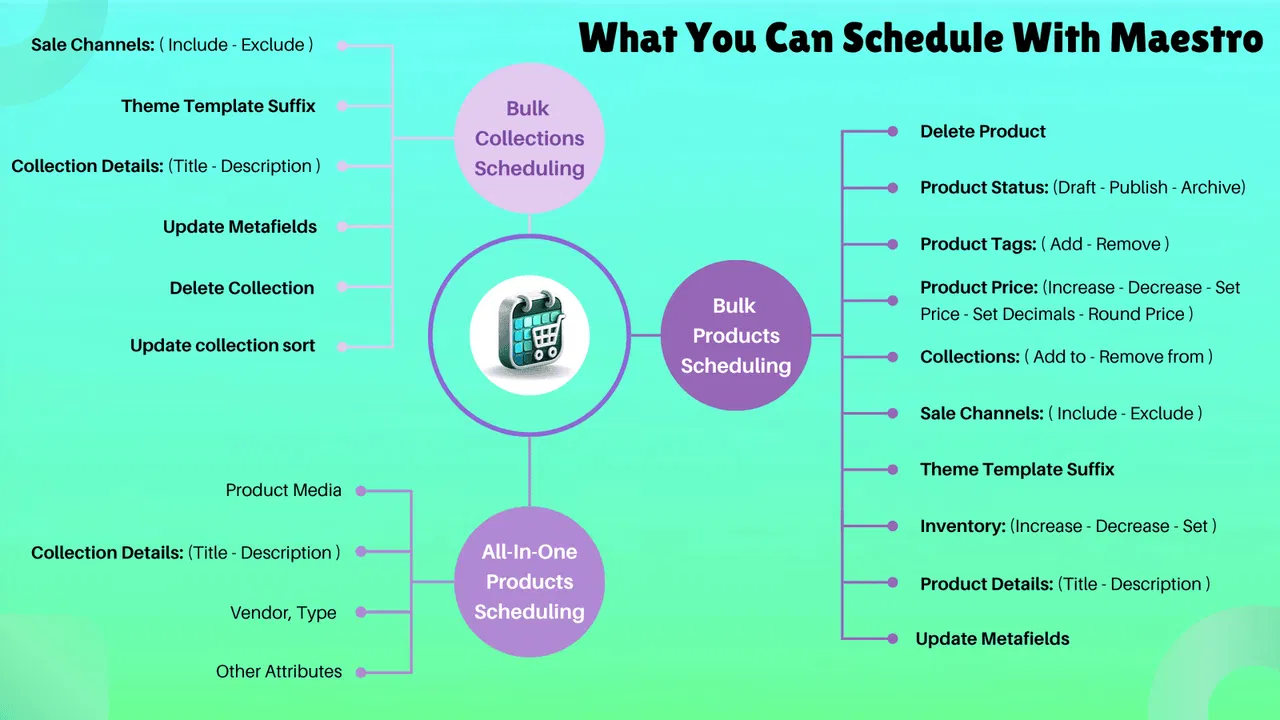
When you are looking for ecommerce maintenance services, automated tag management should be at the top of your list. This process ensures your store remains dynamic without requiring constant manual oversight.
- Add Launch Tags: Schedule the app to add tags like "New Arrival" or "Limited Edition" the moment the product goes live.
- Remove Old Tags: Simultaneously schedule the removal of "Coming Soon" or "Pre-Order" tags to clean up the product data.
- Sync with Collections: Because many Shopify collections are "Automated" based on tags, this step ensures that your new products instantly populate the correct landing pages.
This level of precision is vital for maintaining a clean site architecture. It prevents the awkward scenario where a product is marked as "New" for six months because someone forgot to remove the tag in July.
Step 3: Schedule Price Adjustments and Rounding Rules
Price management is often the most stressful part of a promotion. Whether you are launching a new line with introductory pricing or starting a site-wide seasonal sale, the prices must be perfect.
As a Shopify expert, I often suggest using automated price changes to avoid the "lag" that occurs when manually updating prices across a large inventory. This is a critical component of conversion rate optimization, as inconsistent pricing can immediately break consumer trust.
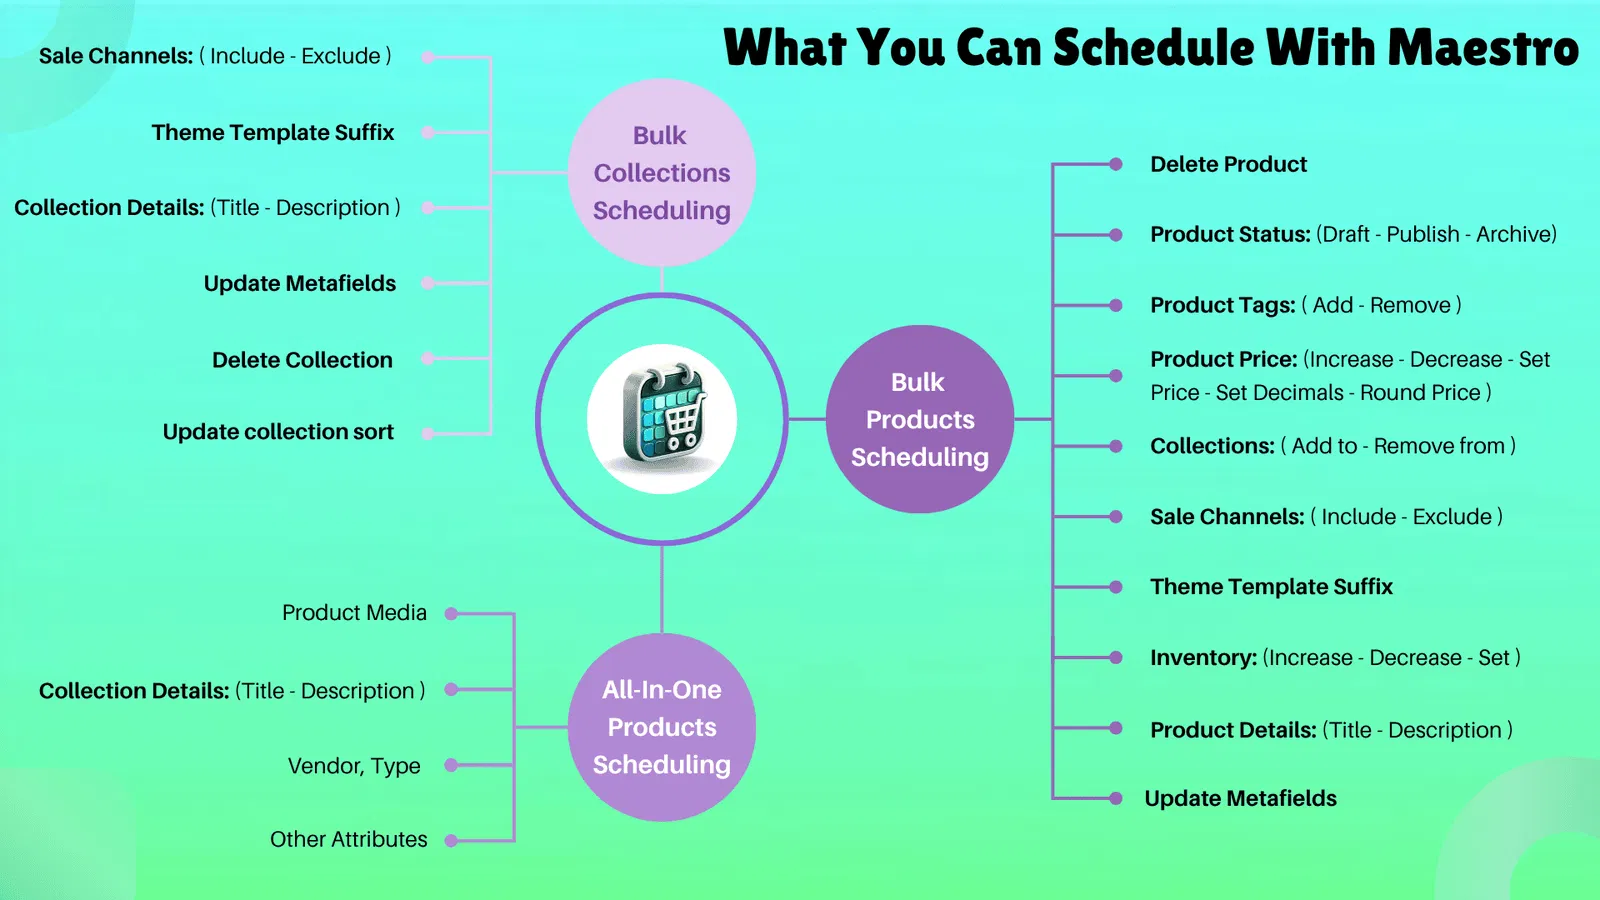
To set up a professional pricing schedule:
- Select the Pricing Action: Within the scheduler, choose whether you want to set a fixed price or adjust by a percentage.
- Apply Rounding Rules: Use the app to ensure all prices end in professional increments, such as .99 or .00. This maintains a consistent brand aesthetic.
- Set the Compare At Price: To show a discount, ensure your "Compare At" price is updated to the original value while the "Price" field reflects the sale cost.
- Schedule the Rollback: This is the most important part. Create a second schedule to automatically revert the prices back to normal once the launch period or sale ends.
This "set it and forget it" approach means you will never accidentally leave a "Black Friday" price active until February. It keeps your margins protected and your store looking sharp.
Step 4: Manage Inventory and Collection Visibility
A launch is not just about making a product "Active." It is about making sure it is in the right place at the right time. If a product is live but buried on page ten of your "All Products" collection, your conversion rates will suffer.
Using the Product Scheduler to manage collection visibility and sorting is a proactive step that distinguishes top-tier merchants from the rest.
- Automate Collection Entries: Schedule products to join specific "Featured" or "Holiday" collections at launch.
- Control Sorting Order: Move new arrivals to the top of the collection automatically so they are the first things a customer sees.
- Inventory Restocks: If you are launching a restock of a popular item, you can schedule the inventory quantities to update at the exact moment your marketing emails go out.
This level of coordination ensures that your marketing efforts and your store's reality are perfectly aligned. When a customer clicks a link in your newsletter, they are greeted by a fully stocked, perfectly priced, and easily findable product.

Reclaiming Your Time with Ecommerce Maintenance Services
While setting up a single launch in five minutes is a massive win, the real power of automation lies in the long-term health of your business. Merchants who utilize these tools are essentially investing in their own freedom. Instead of being tied to the Shopify admin dashboard, you can focus on Growth Strategies and brand building.
At XCO Agency, we specialize in helping businesses transition from manual struggles to streamlined success. Whether you need a full Shopify Design overhaul or ongoing Maintenance Services, our goal is to make your e-commerce journey as "hands-off" as possible.
Integrating the Product Scheduler by Maestro is a vital step toward that goal. It reduces the "human element" of error and ensures your store runs like a well-oiled machine, 24 hours a day.
If you are ready to stop losing sleep over product launches, I encourage you to explore our Shopify Integrations and see how we can power up your store.
Running a successful e-commerce business should be about the thrill of the sale, not the stress of the setup. With five minutes of preparation and the right tools, you can ensure every launch is a flawless success.