
As a Shopify expert, I often encounter merchants who spend several hours every week manually rearranging products within their collections. They are seeking a way to keep their storefronts fresh without the administrative burden of dragging and dropping items one by one. In the fast-paced world of e-commerce, manual merchandising is not just a time-sink, it is a growth killer that prevents you from focusing on high-level growth strategies.
The solution lies in dynamic merchandising through automated collection management. By shifting from manual lists to rule-based systems, you ensure your best-selling products are always visible, out-of-stock items are pushed to the bottom, and new arrivals get the spotlight they deserve. This guide will show you how to set up these systems in just five minutes, allowing you to power up your store efficiency immediately.
Why Automated Merchandising is Vital for Your Store
Before diving into the how, it is important to understand why this shift is a vital step for any scaling brand. Merchants using Shopify Plus development often require advanced logic to handle thousands of SKUs across multiple regions. Manual management at this scale is virtually impossible.
Implementing automated sorting and rule-sets offers several key advantages:
- Consistency Across the Catalog: Automated rules ensure that every product follows the same logic, preventing human error where a new product might be forgotten and left at the bottom of a collection.
- Improved Conversion Rates: By using data-driven rules to sort by sales velocity or inventory levels, you present customers with the products they are most likely to buy.
- Substantial Time Savings: Tasks that previously took an entire afternoon can now be completed in seconds as the system updates in real-time.
- Enhanced Customer Experience: Shoppers never have to scroll through pages of sold-out items to find what they need.
The 5-Minute Setup: Creating an Automated Collection
The fastest way to begin your journey into automation is through Shopify’s native smart collections. This process takes less than five minutes and provides an immediate foundation for more advanced dynamic merchandising later.
Step 1: Navigate to the Collections Panel
Log in to your Shopify admin and head to Products, then select Collections. Click on the Create collection button in the top right corner.
Step 2: Set the Collection Type to Automated
Give your collection a clear, descriptive title such as "New Arrivals" or "Best Sellers." In the Collection type section, ensure you select Automated. This is the trigger that tells Shopify to use rules rather than manual selection.
Step 3: Define Your Rules and Conditions
This is where the power of automation comes into play. You can set conditions based on several attributes:
- Product Tags: Use tags like "New" or "Summer-2026" to automatically group items.
- Price: Create "Under $50" collections by setting a price rule.
- Inventory Levels: Ensure only items with stock greater than zero are shown by adding an inventory condition.
- Product Type: Group all "T-shirts" or "Footwear" instantly.
Ensure you choose whether products must match all conditions or any condition depending on how specific you want the grouping to be.
Step 4: Save and Review
Click save and preview the collection. You will notice that any product meeting those criteria is instantly pulled in. As you add new products to your store in the future, they will automatically populate here if they match your defined tags or types.
Leveling Up with Rankify Smart Collections
While Shopify’s native automated collections are a great starting point, high-growth brands often find they need more granular control. This is where tools like Rankify Smart Collections come into play. As experts in Shopify integrations, we recommend Rankify for merchants who need to go beyond basic filters.
Rankify allows for weighted rule sets. Instead of just "including" a product, you can tell the system how to rank it. For example, you might want to sort a collection primarily by "Best Sellers," but you also want to give a slight boost to products with a high margin or items that were added in the last seven days.
Implementing Weighted Rule Sets
Weighted rules allow you to combine multiple data points into a single sorting logic. You can assign a percentage weight to different factors:
- Sales Velocity (40%): Keep your hottest items at the top.
- Product Age (30%): Ensure new stock gets seen by returning customers.
- Inventory Level (20%): Prioritize items with deep stock to avoid broken sizes.
- Discount Percentage (10%): Give a small nudge to items on sale to clear inventory.
This sophisticated approach to dynamic merchandising ensures that your store layout is always optimized for maximum revenue without you ever lifting a finger.

Advanced Merchandising by Tags and Product Metadata
Custom Shopify themes often rely heavily on tags to drive functionality. Automation allows you to use these tags not just for filtering, but for intelligent display logic.
If you are working with Shopify Plus development, you can use automated collection rules to trigger specific theme sections. For instance, if a product is tagged with "Eco-Friendly," it can automatically be added to a "Sustainable Choices" collection which uses a custom template highlighting your brand’s green initiatives.
Automating Inventory-Based Sorting
One of the biggest frustrations for customers is landing on a collection page only to find the first ten items are out of stock. You can solve this by setting an automated rule that pushes items with zero inventory to the very end of the list. This keeps your store looking professional and reduces bounce rates.
After completing this setup, your collection remains "evergreen." It updates itself every time a sale is made or a new shipment arrives in the warehouse.
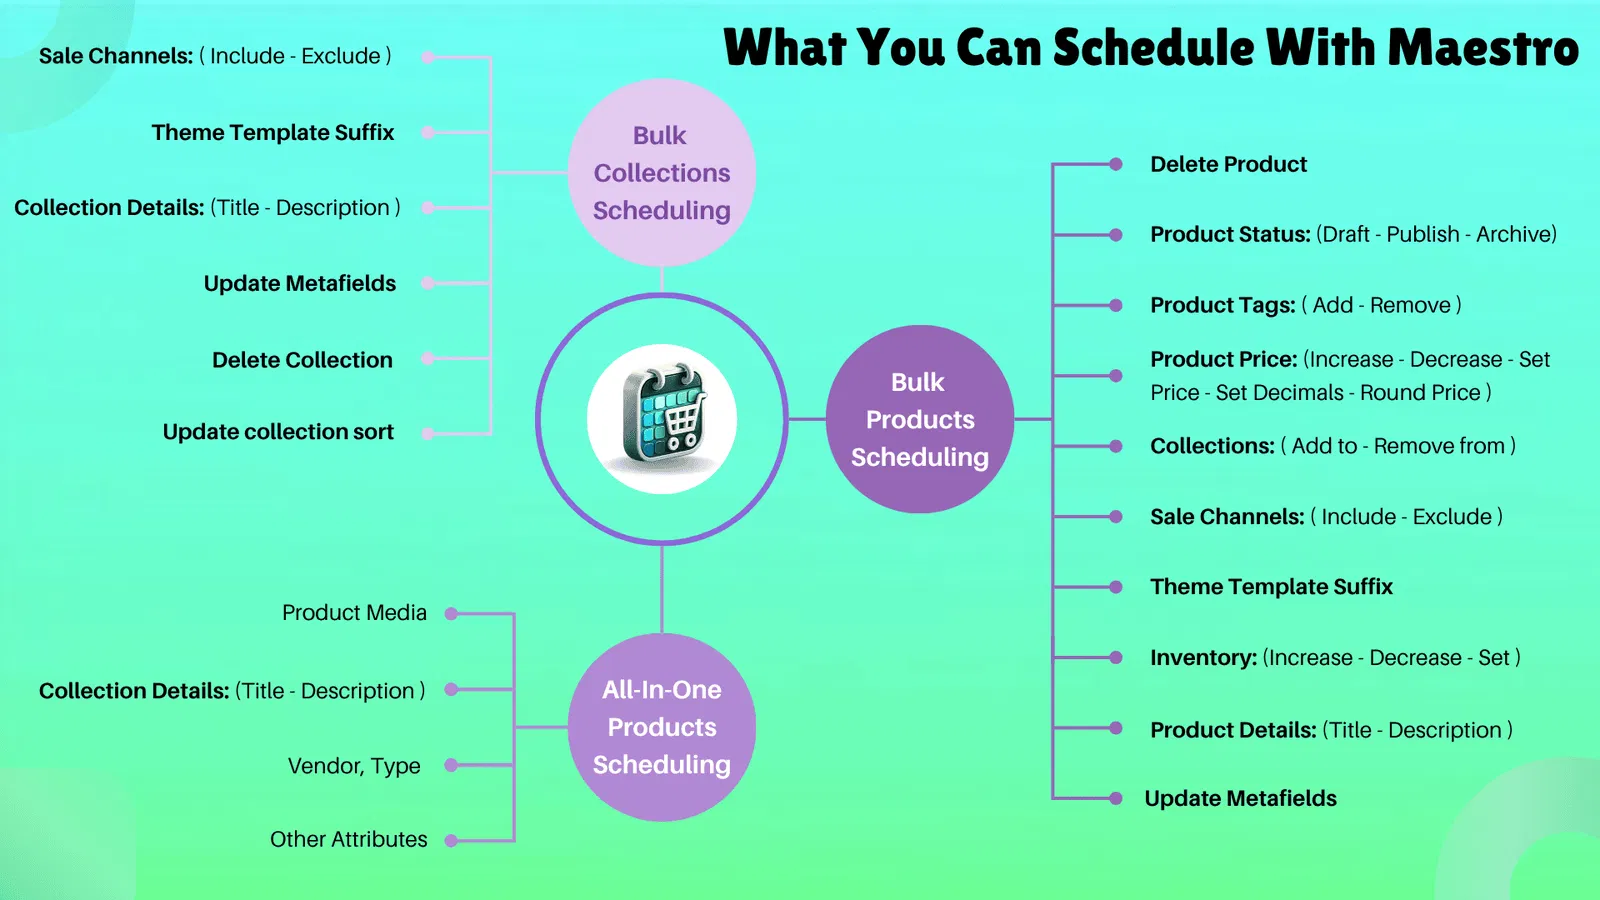
Integration with Scheduling and Campaigns
Automation shouldn't stop at just grouping products. To truly optimize your store, you need to coordinate your collections with your marketing calendar. Using tools like the Maestro app, you can schedule when certain collection rules or theme visibility settings go live.

For example, if you are launching a "Midnight Madness" sale, you can schedule an automated collection to become the primary focus of your homepage at exactly 12:00 AM. This level of precision is a proactive step that ensures your store is always aligned with your current growth strategies.
Best Practices for Maintaining Automated Systems
While the goal is to "set it and forget it," periodic audits are helpful to ensure your rules are still aligned with your business goals. Here are a few tips for maintaining your automated merchandising:
- Standardize Your Tagging: Ensure your team follows a strict tagging protocol. If one person tags an item "New" and another tags it "New Arrival," your automated rules might miss products.
- Monitor Search Trends: If you notice customers are searching for a specific attribute that you don't currently use in your rules, add it as a tag and create a new automated collection.
- Test Sorting Logic: Occasionally view your collections from a customer's perspective on mobile. Ensure the "weighted" logic is resulting in a layout that makes sense and looks appealing.
- Utilize Speed Optimization: High-performing automated collections are great, but ensure your collection pages are optimized for speed. Slow-loading collections can negate the benefits of good merchandising. You can learn more about this on our Shopify speed optimization page.

Future-Proofing Your Merchandising Strategy
As e-commerce moves toward more personalized experiences, automation will become even more central to store management. We are seeing a shift where collections are not just static lists, but dynamic environments that change based on user behavior or regional availability.
For merchants looking to scale, investing in Shopify Plus development and advanced automation tools is no longer optional. It is the foundation of a modern e-commerce operation. By taking five minutes today to set up your first automated collection, you are reclaiming hours of your time and setting your store up for long-term success.
If you are unsure where to start or need a more custom solution for your store, we invite you to book a meeting with our team. We specialize in creating high-performance Shopify environments that leverage the full power of automation.
Conclusion: Take the Leap Into Automation
Automating your Shopify merchandising is a simple steps process that yields massive dividends. By moving away from manual sorting and embracing rule-based collections, you ensure your store is always optimized, your inventory is managed effectively, and your customers have a seamless shopping experience.
Whether you are just starting with basic Shopify smart collections or looking to implement advanced weighted rules with Rankify, the key is to start now. Identify your most time-consuming manual task, apply one of the rules mentioned above, and watch your store become more efficient instantly.
For more insights on how to grow your e-commerce business, explore our our services or read more about our growth strategies. Automation is the engine of modern retail. It is time to let it work for you.