
Meta title: Advanced Shopify Multi-Store Rollouts with Maestro Theme Scheduler
Meta description: Learn how to synchronize custom Shopify themes and coordinate global store rollouts with GitHub, Shopify Plus development, and Maestro Theme Scheduler.
As a Shopify expert, I often work with brands that are seeking one simple thing: a reliable way to launch the same campaign across multiple storefronts without turning launch night into a group project involving spreadsheets, alarms, and increasingly nervous messages in Slack.
For Shopify Plus brands, multi-store operations can become complex quickly. You may manage separate stores for the United States, Europe, the United Kingdom, or wholesale customers. Each store can have different currencies, markets, inventory rules, content, and local promotions.
At the same time, your customers should still experience a consistent brand.
That is where a well-planned combination of custom Shopify themes, Shopify Plus development, GitHub workflows, and Maestro Theme Scheduler becomes valuable.
With the right setup, you can:
- Synchronize custom theme code across multiple Shopify stores.
- Preserve regional flexibility for content, currencies, and promotions.
- Schedule coordinated launches across time zones.
- Automate seasonal sections, banners, and theme publishing.
- Reduce manual errors during high-pressure campaigns.
Multi-store synchronization is more than copying a theme
The first important distinction is that multi-store synchronization has several layers.
Theme code synchronization
This covers the underlying code, including:
- Liquid templates
- JSON templates
- Sections and blocks
- CSS and JavaScript
- Theme settings schema
- Custom app blocks
- Reusable components in a custom Shopify theme
Your development team can maintain this code in a shared GitHub repository and connect each store to the appropriate branch using Shopify’s GitHub integration.
Store configuration synchronization
This includes the settings that may vary between storefronts:
- Regional logos or legal text
- Currency and language settings
- Market-specific links
- Localized product messaging
- Analytics and tracking IDs
- Payment or shipping information
- Regional campaign content
These settings should not always be identical. A global store rollout needs consistency where it helps, not uniformity for its own sake.
Content and publication synchronization
This is the layer where Maestro Theme Scheduler is especially useful. You can schedule:
- Theme publishing
- Homepage sections
- Promotional banners
- Product launch content
- Seasonal graphics
- Slideshows
- Individual blocks
- Content visibility windows
In other words, the code can be synchronized through your development workflow, while the customer-facing changes can be coordinated with scheduled automation.

Build a reliable multi-store architecture
Before scheduling a global rollout, define which systems control which parts of the experience. Otherwise, every tool starts editing everything, which is the digital equivalent of five chefs arguing over one saucepan.
A practical architecture usually includes:
- GitHub as the source of truth for theme code
- Shopify admin for store-specific settings
- Metafields or metaobjects for structured regional content
- Maestro for scheduled theme and content changes
- Analytics tools for post-launch monitoring
For Shopify Plus development teams, there are two common repository strategies.
Option 1: Use one shared production branch
Connect each store to the same production branch when:
- The custom Shopify theme is largely identical across stores.
- Regional content is managed through settings, metafields, or metaobjects.
- You want one code release to move across every storefront.
This approach is straightforward, but it requires discipline around store-specific configuration.
Option 2: Use separate production branches
Create a production branch for each region or store when:
- Storefronts have meaningful design differences.
- Local regulations require different layouts or disclosures.
- Certain stores use unique apps, templates, or sales flows.
- Release timing varies by market.
This provides more control, although it also introduces more maintenance. Whichever model you choose, document it clearly and assign ownership for approving releases.
A step-by-step global rollout process
Here are simple steps for coordinating a multi-store launch with Maestro Theme Scheduler.
Step 1: Map every storefront and launch requirement
Start by listing each store involved in the rollout.
For every storefront, document:
- Store name and market
- Primary time zone
- Currency and language
- Connected GitHub branch
- Theme version or release candidate
- Regional content differences
- Launch owner
- Rollback contact
Then decide whether the campaign launches at one global moment or at different local times.
For example, a brand may want:
- The US store to launch at 9:00 a.m. Eastern Time.
- The UK store to launch at 9:00 a.m. British Summer Time.
- The European store to launch at 9:00 a.m. Central European Time.
Do not rely on memory for time zones. Convert every launch time into a documented reference, such as UTC, and verify daylight saving changes before scheduling.
Step 2: Prepare the custom Shopify theme
Develop the campaign in a feature branch before touching production.
Your development team should:
-
Create the campaign sections and blocks.
- Add clear schema settings for text, images, links, and product references.
- Use reusable components wherever possible.
- Keep promotional content configurable rather than hard-coded.
-
Test the theme in a development or staging environment.
- Check desktop, tablet, and mobile layouts.
- Test navigation, product pages, cart behavior, and search.
- Confirm compatibility with installed apps and app blocks.
-
Review theme settings and dependencies.
- Ensure new settings exist before dependent sections are pushed.
- Verify that theme configuration does not overwrite regional content.
- Confirm that tracking scripts and analytics events still fire correctly.
-
Merge the approved release into the correct production branch.
For detailed theme work, XCO Agency provides Shopify design services, including custom theme development and customization for growing brands.
Step 3: Create a release candidate in every store
Each Shopify store needs its own theme instance. Even when stores share the same codebase, the draft theme, settings, apps, and market configuration can differ.
In each store:
- Create or update the draft theme.
- Connect it to the correct GitHub branch.
- Confirm the expected commit or release version.
- Review the theme preview.
- Check store-specific settings.
- Keep the current live theme available for rollback.
Do not publish immediately after the code arrives. First, compare the draft theme across stores.
Check:
- Hero imagery
- Promotional copy
- Product and collection links
- Currency formatting
- Localized content
- Footer and legal information
- App integrations
- Mobile spacing and performance
This is where a strong Shopify integrations strategy can prevent issues between your theme, marketing tools, analytics platforms, and operational systems.
Step 4: Schedule the rollout with Maestro
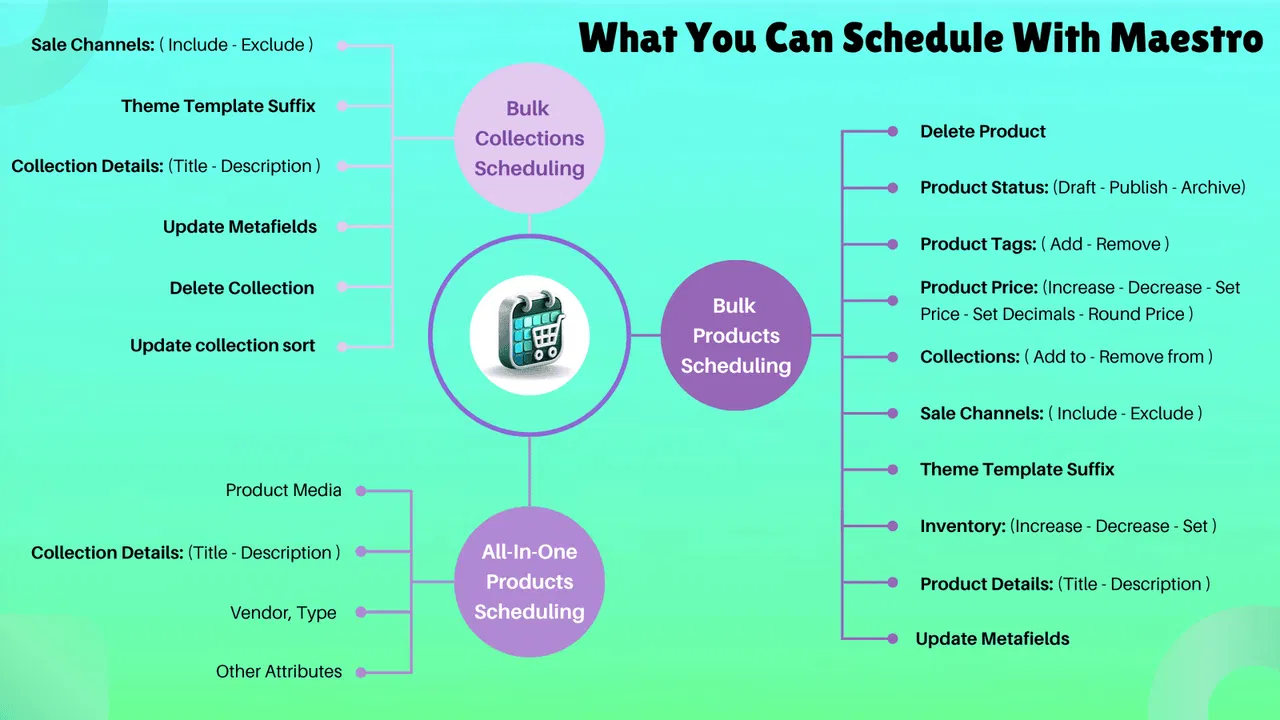
Once every store has an approved draft theme, configure Maestro Theme Scheduler in each storefront.
Maestro can help automate:
- Full theme publishing at a specific date and time
- Section and block visibility
- Promotional banners
- Seasonal content
- Recurring campaigns
- Theme history tracking
Use the same release naming convention across stores. For example:
SPRING-2027-GLOBAL-ROLLOUT
Then configure the schedule for each store.
- Select the target store.
- Navigate to the Maestro scheduling area.
- Choose the draft theme or specific section.
- Set the publication date and time.
- Confirm the store’s time zone.
- Add a clear internal note.
- Review the schedule before saving.
For a campaign that should begin at the same instant worldwide, use the same UTC timestamp across all stores.
For localized launches, schedule each store based on its local marketing plan. Maestro’s multi-timezone capabilities make it easier to align storefront updates with regional campaign windows rather than asking someone to publish a theme at 3:00 a.m.
Install Maestro Theme Scheduler from the Shopify App Store, or review the Maestro Theme Scheduler product page for more information.
Step 5: Validate the rollout and prepare a rollback
Automation reduces manual work, but it does not eliminate the need for quality assurance. A scheduled launch still deserves a checklist.
After completing the rollout, verify:
- The correct theme is live in every store.
- The homepage displays the intended campaign.
- Scheduled sections and blocks are visible.
- Promotional links work correctly.
- Products and collections are available.
- Currency and regional content are correct.
- Cart and checkout flows work as expected.
- Analytics and conversion tracking are recording activity.
- Page speed remains within acceptable limits.
Keep the previous theme version available until the campaign has been fully validated. If one regional store encounters an issue, you can roll back that store without interrupting every other market.
For additional support with technical performance, explore Shopify speed optimization services.

Common multi-store rollout mistakes to avoid
Treating themes and catalog data as the same thing
A theme controls the storefront experience. It does not automatically synchronize products, inventory, prices, or orders between stores.
Use dedicated integrations or Shopify Plus development workflows for operational data. Use GitHub and theme management tools for storefront code and presentation.
Overwriting regional settings
A shared theme release should not accidentally replace local tracking IDs, legal copy, or market-specific content.
Use theme settings, metafields, metaobjects, and documented configuration rules to separate shared code from local content.
Scheduling without checking time zones
A launch scheduled for 9:00 a.m. in one store may occur at an entirely different moment elsewhere. Confirm every schedule and record the time zone in the release plan.
Publishing without a rollback plan
Even well-tested releases can encounter app conflicts, missing translations, or unexpected content behavior. Keep the last stable theme available and assign someone to monitor the rollout.
A smarter way to manage global campaigns
Imagine launching a holiday promotion across five stores.
Your team builds one campaign component in a custom Shopify theme. The code is tested in staging, merged into the correct branches, and deployed to draft themes. Regional teams then adjust their own copy and imagery without changing the underlying layout.
Finally, Maestro schedules the campaign banners and theme publishing for each market. The US promotion appears at its planned local time, the UK store follows its own schedule, and the European storefront activates when its campaign begins.
No midnight publishing marathon. No frantic checklist roulette. Just a repeatable release process.
That is the real value of combining Shopify Plus development with theme scheduling. You gain control without forcing every storefront to behave identically.
Final thoughts
Advanced multi-store synchronization is not about finding one magic button. It is about creating a dependable system where each tool does the job it is best suited to do.
Use GitHub to manage and synchronize custom Shopify theme code. Use Shopify admin and structured content tools for regional configuration. Use Maestro Theme Scheduler to automate theme publishing, sections, blocks, and campaign visibility across individual storefronts.
For growing brands, this approach is a vital step toward consistent global merchandising and a more manageable Shopify Plus operation. It is also a proactive step toward fewer launch errors, faster campaign execution, and a storefront experience that feels intentional in every market.
Ready to improve your multi-store Shopify workflow? Book a consultation with XCO Agency to plan a scalable theme, integration, and rollout strategy.