
As a Shopify expert, I often work with merchants seeking more control over campaign launches, seasonal storefront updates, and promotional content. The problem is rarely a lack of creativity. It is usually the operational puzzle that follows: how do you make the right banner, section, or block appear at the right time without manually publishing an entire theme at midnight?
That is where custom Shopify themes, thoughtful block architecture, and Maestro Theme Scheduler work together.
A well-structured theme gives your team reusable building blocks. Maestro adds the scheduling layer that helps those blocks appear, disappear, or change according to your campaign calendar.
The result is a storefront that can:
- Launch promotions automatically without last-minute theme publishing
- Synchronize sections and blocks across multiple templates
- Support recurring campaigns such as weekly offers or seasonal updates
- Reduce operational risk by limiting changes to controlled storefront areas
- Scale more effectively for Shopify Plus development and multi-market commerce
In other words, your theme does the building, and Maestro handles the timing. A surprisingly productive partnership.
Why custom theme architecture matters for scheduling
A custom Shopify theme is more than a visual layer. It is the operating structure of your storefront.
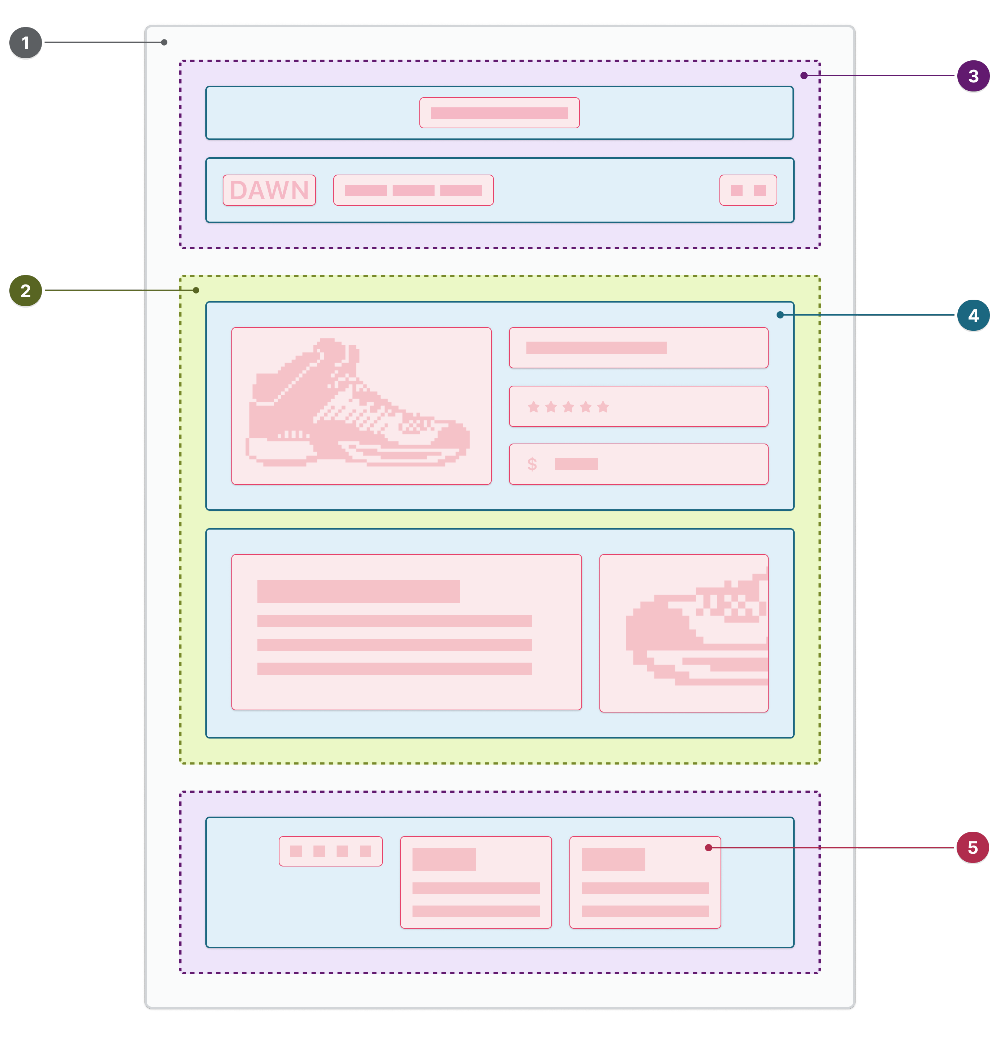
Shopify’s modern theme architecture separates the storefront into layouts, templates, sections, blocks, snippets, assets, and configuration files. Each layer has a role:
- Layout files provide repeated elements such as the header, footer, and global scripts.
- JSON templates define which sections appear on product, collection, homepage, and other page types.
- Section groups organize areas such as headers and footers.
- Sections act as reusable modules, including hero banners, product grids, and promotional strips.
- Blocks provide smaller content units inside sections, such as slides, buttons, cards, or product highlights.
- Snippets store reusable Liquid logic.
- Configuration files store settings used by the Shopify theme editor.
Shopify explains this structure in its official theme architecture documentation.
For scheduling, this hierarchy is important because Maestro should not need to treat your theme like a mystery box. It needs clear, predictable components to work with.
A fragile theme often relies on:
- Hard-coded promotional content
- Sections that depend heavily on one another
- Unclear naming conventions
- Block positions instead of stable identifiers
- JavaScript that controls visibility in inconsistent ways
That setup can make a simple campaign update feel like defusing a small digital bomb.
A modular architecture, on the other hand, makes theme automation safer, easier to test, and easier to maintain.
The ideal architecture for Maestro Theme Scheduler
The goal is not to schedule every line of Liquid. The goal is to create specific, well-defined areas that Maestro can control without disturbing the rest of the store.
1. Keep the theme modular
Build each section around one clear responsibility.
For example:
section-maestro-announcementsection-maestro-campaign-herosection-maestro-promo-gridsection-maestro-countdownsection-maestro-seasonal-navigation
Each section should have a focused purpose and a predictable schema. Avoid creating one enormous “everything section” with dozens of unrelated settings. It may look efficient at first, but it becomes difficult for merchants and scheduling tools to manage.
A modular section should include:
- Clear content settings
- Separate layout and design settings
- Visibility controls
- Mobile-friendly options
- Sensible fallback content
- Accessible markup and labels
Shopify’s theme development best practices also recommend prioritizing performance, accessibility, mobile-first design, and simple customization.
2. Separate content from presentation
Maestro should primarily control campaign content and timing. It should not constantly rewrite typography, spacing, or brand colors.
Separate settings into logical groups:
- Content: headline, description, image, CTA, product, link
- Schedule behavior: visibility, campaign status, start and end conditions
- Layout: alignment, spacing, column count
- Design: colors, typography, overlays, borders
For more advanced builds, store campaign content in metafields or app-managed data, then allow the section to render the active variant.
This means a single hero section could display:
- A standard evergreen message
- A Black Friday variant
- A regional promotion
- A loyalty-only offer
- A post-campaign fallback
The structure remains stable while the content changes. That is the kind of flexibility that keeps a custom theme useful long after launch.
Block synchronization: move beyond positional logic
One of the most important principles in advanced Shopify Plus development is to avoid relying on block position alone.
If your scheduling logic says “update the third block in the homepage hero,” it may work until someone reorders the blocks in the theme editor. Then block three is no longer the block you intended to update. Congratulations, your summer sale now promotes winter boots.
Instead, use stable identities and explicit ownership.
Create Maestro-managed zones
Define which areas of the theme Maestro can control.
For example:
| Storefront area | Maestro control | Merchant control |
|---|---|---|
| Homepage campaign hero | Content and visibility | Styling and layout |
| Collection promo banner | Schedule and CTA | Placement rules |
| Product page cross-sell block | Campaign variant | Design settings |
| Global announcement bar | Message and timing | Brand colors |
| Footer navigation | None | Full control |
This division prevents accidental overwrites and gives your team a clear operating model.
A managed zone could be:
- A dedicated section
- A group of specific blocks
- An app block slot
- A metafield-driven content area
- A campaign template used only for scheduled events
The safest approach is to keep Maestro’s control narrow and deliberate. Let it manage what changes frequently, while the theme editor continues to manage what defines the brand.
Use stable block IDs
Every scheduled block should have a predictable identity. Names such as holiday-hero-2026, vip-promo-bar, or weekly-offer-card are much safer than references to array positions.
A conceptual synchronization map might look like this:
{
  "campaign": "holiday-sale-2026",
  "template": "index",
  "managed_zone": "campaign_hero",
  "blocks": [
    {
      "id": "holiday-hero-2026",
      "start": "2026-11-20T00:00:00",
      "end": "2026-12-02T23:59:59",
      "visibility": "scheduled"
    }
  ]
}
This is not a copy-and-paste Maestro configuration. It is an architectural model that shows how your development team can think about campaign ownership, timing, and block identity.
How Maestro Theme Scheduler fits into the workflow
Maestro Theme Scheduler supports scheduled theme publishing, recurring schedules, content automation, and visibility controls for sections and blocks. Its product documentation also highlights the ability to schedule individual sections without publishing an entire theme.
That granular control is particularly useful for custom themes.

Here are simple steps for integrating scheduling into an advanced theme architecture.
Step 1: Audit the current theme
Review the theme before adding automation.
Check:
- Theme architecture and Online Store 2.0 compatibility
- JSON templates and section groups
- Existing promotional sections
- App blocks and app embeds
- Theme editor settings
- Market and localization requirements
- Existing scripts that control visibility
- Performance and accessibility issues
This audit identifies which parts of the theme are safe to schedule and which parts need refactoring.
Step 2: Define campaign use cases
List the storefront changes your team needs to automate.
Common examples include:
- Flash sale banners
- Seasonal homepage heroes
- Holiday navigation
- Product launch sections
- Regional promotions
- Recurring weekly offers
- Temporary announcement bars
- Campaign-specific collection content
Prioritize high-frequency, high-impact updates first. There is little value in automating a footer disclaimer that changes once every three years.
Step 3: Refactor sections and blocks
Create or update sections with scheduling in mind.
Ensure each managed component includes:
- A stable section or block identity
- A clear content source
- A visibility fallback
- Start and end behavior
- A defined owner
- Responsive styling
- Accessibility-friendly markup
Keep schedule-related settings separate from design controls. This lets marketing teams manage campaigns without accidentally turning the homepage into a typography experiment.
Step 4: Configure Maestro-managed areas
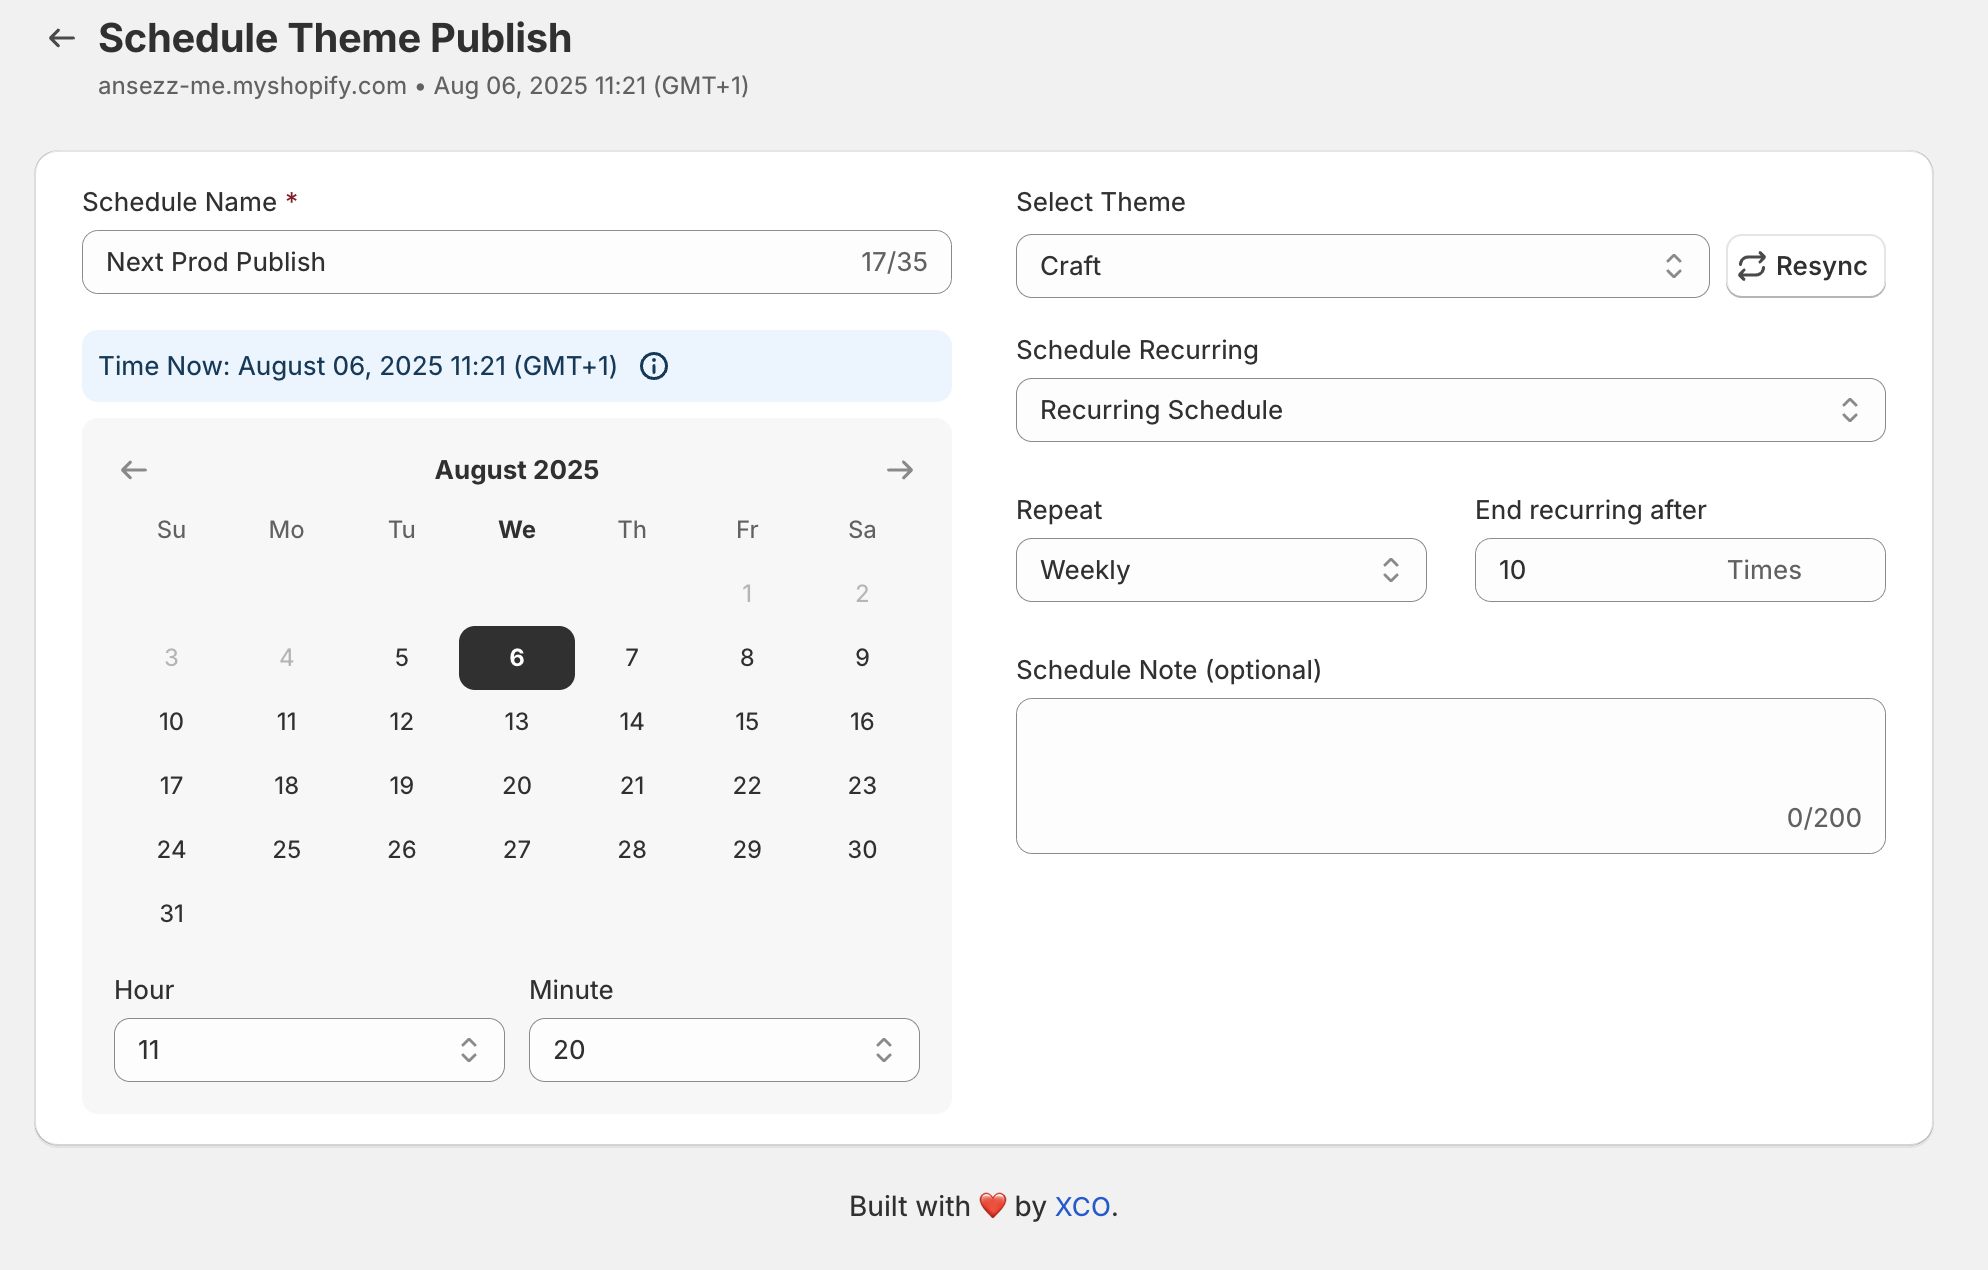
In Maestro, select the theme, section, block, or content area that should change.
Depending on the campaign, configure:
- Start date and time
- End date and time
- Recurrence
- Time zone
- Theme or template
- Content variant
- Notes for internal teams
Maestro will guide you through the scheduling process, making it easier to coordinate changes before a campaign goes live.
Step 5: Test synchronization on a draft theme
Never test a major campaign directly on production if you can avoid it.
Use a draft or staging theme to verify:
- The correct block appears
- The correct template is updated
- The start and end times match expectations
- The storefront behaves correctly across devices
- The campaign does not affect unmanaged sections
- Product links, images, and promotional prices are accurate
- Analytics and tracking events still fire
For Shopify Plus merchants, test important journeys across markets, customer types, and devices. A campaign that works in the United States but displays the wrong currency in another market is not exactly the seamless automation experience anyone ordered.
Step 6: Add operational safeguards
Build a simple governance process around scheduling.
Document:
- Which sections Maestro manages
- Who can create or edit schedules
- Which theme is used for testing
- How campaign changes are approved
- How conflicts are resolved
- Where schedule history is reviewed
Use clear campaign names and internal notes. For example:
US-BFCM-Homepage-Hero-Nov20-Dec2
That is much easier to audit than new schedule final final 2.
Shopify Plus considerations for advanced scheduling
For enterprise stores, block synchronization must account for more than one storefront view.
Multi-market content
Campaigns may vary by:
- Country
- Currency
- Language
- Inventory availability
- Shipping eligibility
- Local promotion dates
- Regional compliance requirements
Use market-aware content sources and test each relevant storefront experience before publishing.
B2B and customer-specific messaging
Shopify Plus stores may also need different content for B2B buyers, wholesale customers, loyalty members, or tagged customer groups.
A campaign section should be able to support controlled variations without duplicating the entire theme. Metafields, customer data, and app integrations can help deliver the correct message while keeping the theme architecture maintainable.
For complex data flows, XCO Agency also provides Shopify integration services that connect storefronts with ERP, CRM, marketing, analytics, and custom systems.
Performance and maintainability
Avoid loading large scripts or heavy assets simply to determine whether a scheduled block should appear. Wherever possible:
- Render the correct state efficiently
- Lazy-load non-critical media
- Optimize campaign images
- Minimize JavaScript dependencies
- Keep sections self-contained
- Monitor Core Web Vitals after launch
A beautiful campaign that slows down the storefront is a promotion with questionable manners.
When should you use full theme publishing?
Maestro can be useful at two different levels.
Use full theme publishing when you need to release:
- A complete seasonal design
- A major navigation change
- A new product page architecture
- A coordinated redesign
- A large collection of structural updates
Use section and block scheduling when you need to change:
- A hero banner
- A promotional strip
- A campaign card
- A seasonal announcement
- A product launch module
- A temporary content block
This distinction is valuable because it reduces unnecessary risk. You do not need to publish an entire theme to change one homepage banner.
Final thoughts: build the theme for change
Advanced custom theme architecture is not about adding complexity for its own sake. It is about creating a flexible foundation that lets your business move quickly without breaking the storefront.
When your sections are modular, your blocks have stable identities, and your content sources are structured, Maestro Theme Scheduler can help coordinate campaigns with much greater precision.
The vital step is to design scheduling into the theme from the beginning, rather than treating it as an emergency patch later. That proactive step can significantly reduce manual work, improve campaign consistency, and give your Shopify Plus team more confidence during high-pressure launches.
Ready to optimize your storefront architecture? Explore Maestro Theme Scheduler, install it for free through the Shopify App Store, or book a consultation with XCO Agency to discuss custom Shopify theme development and block synchronization.
Meta title: Custom Shopify Theme Architecture with Maestro Scheduler
Meta description: Learn how to synchronize custom Shopify theme sections and blocks with Maestro Theme Scheduler for safer, faster Shopify Plus campaign automation.