
As a Shopify expert, I often work with store owners who are seeking a way to reclaim their weekends. They are tired of the manual grind that comes with running a high growth store. If you have ever stayed up until midnight on a Sunday just to hit "Publish" on a new collection or to change prices for a flash sale, you know exactly what I am talking about. Manual catalog management is not just a time sink: it is a recipe for human error that can hurt your conversion rate optimization.
The dream of an e-commerce business is often portrayed as passive income while you sip a drink on a beach. The reality is usually more like wrestling with CSV files and triple checking product tags. However, with the right ecommerce maintenance services and tools, you can actually move closer to that hands off reality.
In this guide, I will show you how to automate your entire Shopify catalog using the Product Scheduler by Maestro. We are going to look at how to streamline your shopify store setup so that your catalog practically runs itself.
Why Manual Catalog Management Is Killing Your Growth
Before we dive into the "how," we need to address the "why." Merchants often overlook the hidden costs of manual labor. Every minute you spend manually updating a product description or toggling a visibility switch is a minute you are not spending on marketing or strategy.
- Human Error: One wrong decimal point in a price update can lead to massive losses or frustrated customers.
- Consistency Issues: Inconsistent tagging leads to broken filters, which ruins the user experience.
- Missed Opportunities: If you are too busy managing the "now," you cannot prepare for the "next."
- Burnout: High stress launches are not sustainable for small teams or solo founders.
By automating these tasks, you boost your store's efficiency and ensure that your brand remains professional and reliable at all hours of the day.
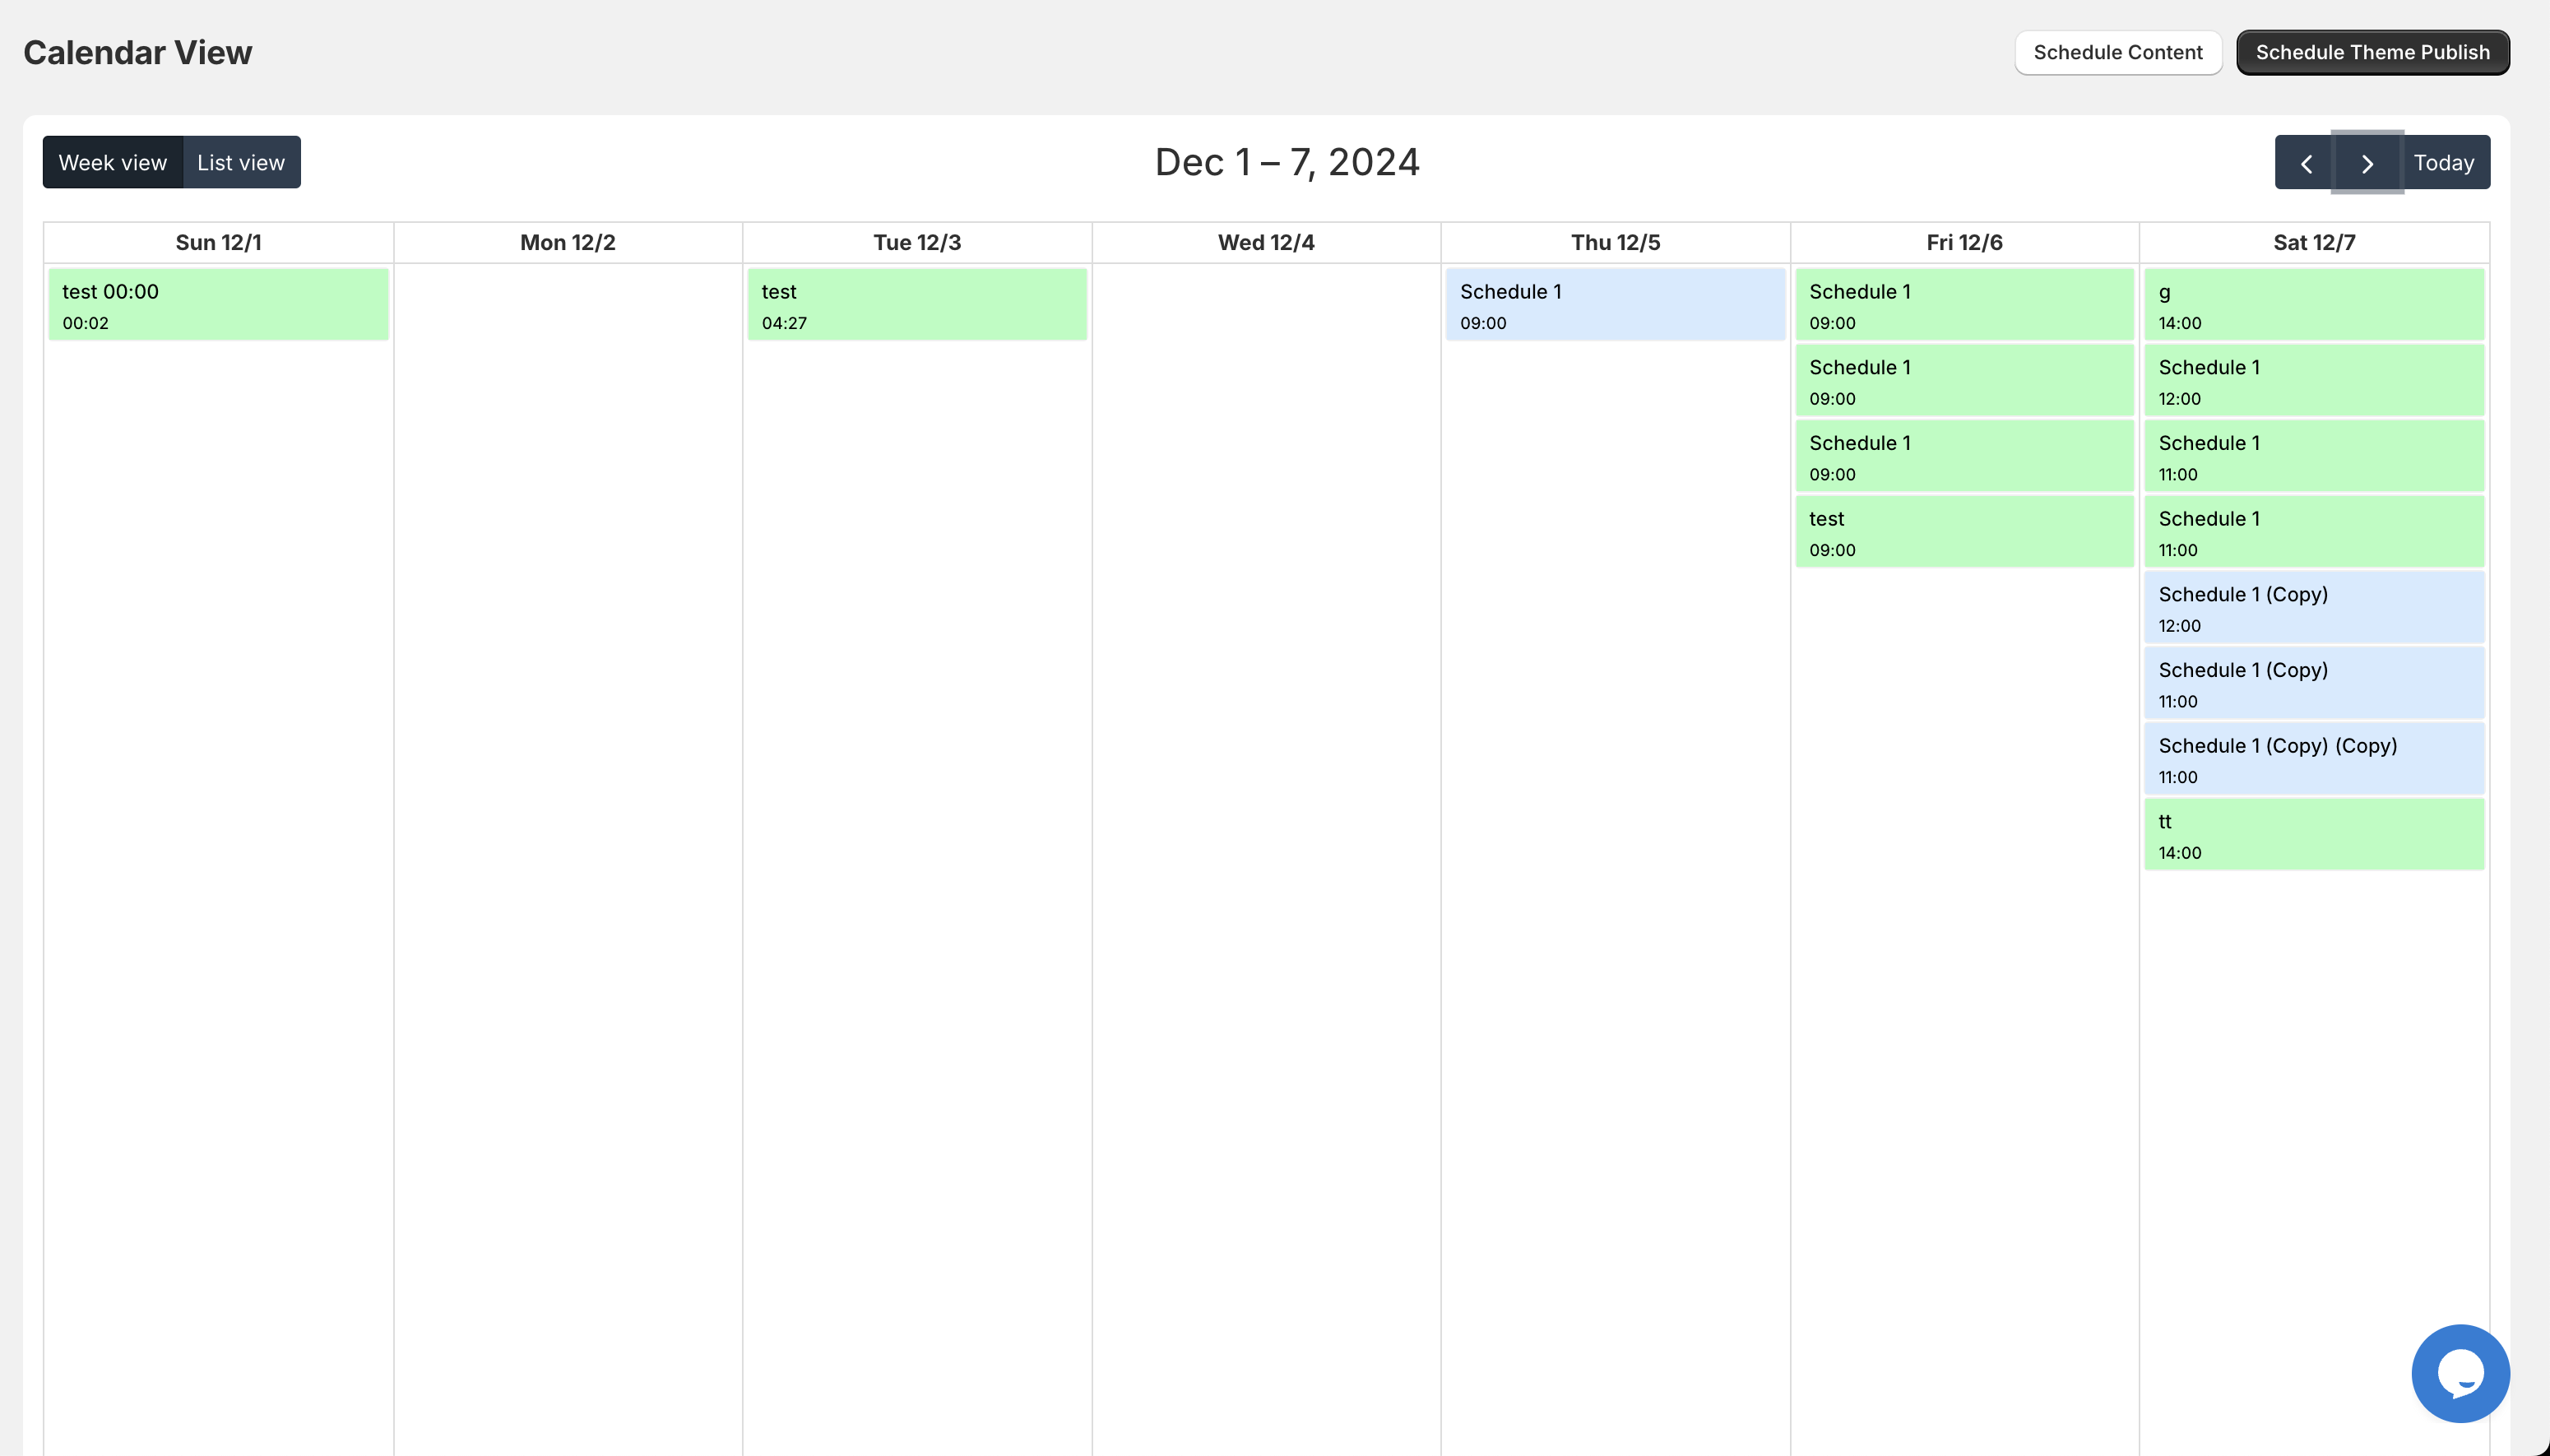
Step 1: Using the Draft Helper for Perfect Launches
The first step in automating your catalog is mastering the launch. Most merchants leave products in "Draft" mode until they are ready to go live. The problem is that Shopify does not have a native, robust way to schedule that transition for specific groups of products without a lot of clicking.
As a Shopify expert, I recommend using the "Draft Helper" feature within the Maestro app. This allows you to set a specific date and time for your drafts to become active products.
- Select Your Products: Filter your product list in the Maestro interface to find the drafts you have been working on.
- Set the Launch Window: Choose the exact second you want these products to appear on the storefront.
- Automate Visibility: Ensure they are not just "Active" but also visible on the correct sales channels.
This simple automation ensures that your shopify store setup is always ahead of schedule. You can prep your entire Q4 launch calendar in a single afternoon and never worry about a late night launch again.
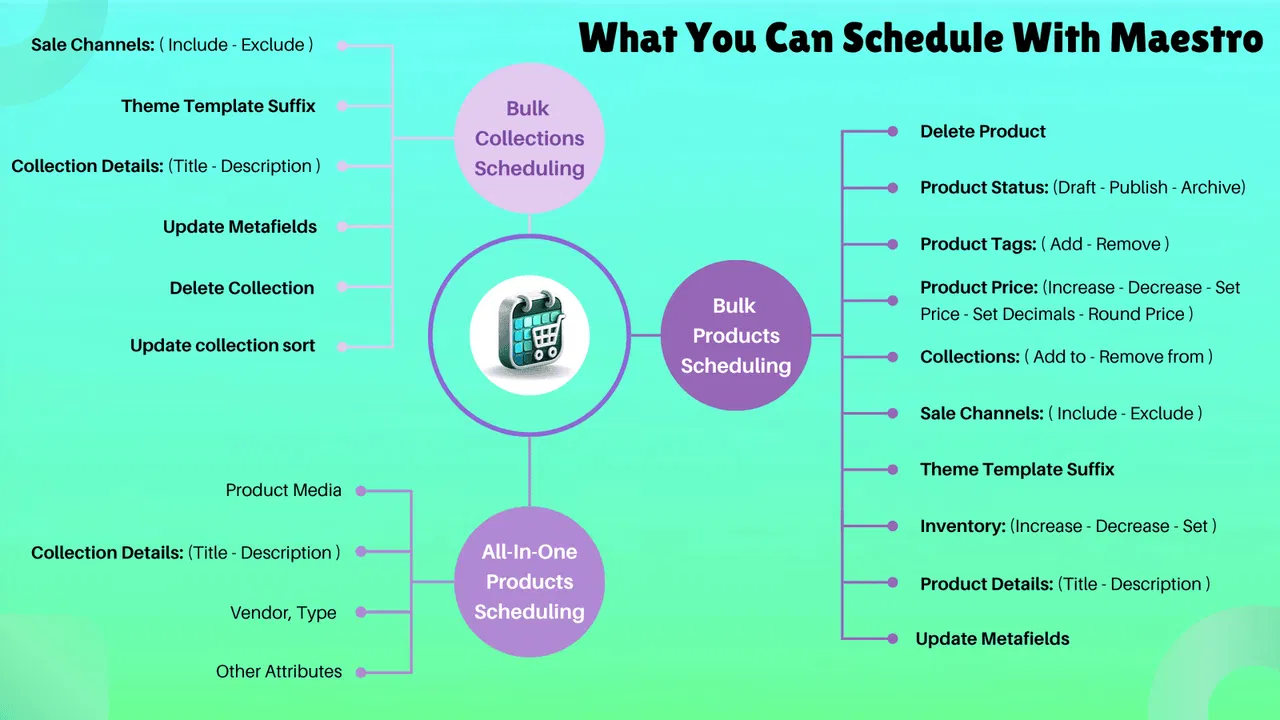
Step 2: Automated Tag Management for Seasonal Sales
Tags are the lifeblood of Shopify organization. They power your filters, your smart collections, and even some of your marketing automations. But managing them manually is a nightmare. When a sale ends, you have to go back and remove the "Sale" tag from every single item. If you miss one, you have a confused customer and a messy storefront.
Automated tag management allows you to schedule when tags are added and, more importantly, when they are removed.
- Identify Sale Items: Group products that will participate in your upcoming promotion.
- Schedule Tag Addition: Set a rule to add a "Summer-Sale" tag at 8:00 AM on Monday.
- Schedule Tag Removal: Set a rule to automatically strip that tag at midnight on Friday.
- Update Collections: Because your collections are likely based on these tags, your storefront will update automatically without you lifting a finger.
This level of precision is vital for conversion rate optimization. It ensures that your customers always see relevant, up to date content and filtering options.
Step 3: Scheduling Price Changes and Rounding Rules
Price management is where things get technical and risky. During a major holiday like Black Friday, you might want to slash prices by 20 percent across the board. Doing this manually for 500 products is impossible. Using a CSV import is better, but it is still prone to errors.
The Product Scheduler by Maestro handles this with bulk price adjustment rules.
- Define the Scope: Choose the products, collections, or vendors that need a price update.
- Apply the Discount: Set a percentage or fixed amount decrease.
- Use Rounding Rules: This is the pro tip. You can tell the app to always round prices to the nearest .99 or .95. This maintains a clean, professional look for your store.
- Schedule the Reversion: Tell the app exactly when to put the prices back to their original state.
By automating this, you eliminate the "morning after" scramble to fix prices after a sale ends. Your margins stay protected and your store remains consistent.
Step 4: Inventory Automation for Seamless Restocks
Nothing kills a conversion faster than an "Out of Stock" button. While you cannot always control your supply chain, you can control how your store reacts to restocks.
Many merchants use ecommerce maintenance services to handle back end updates, but you can automate much of this yourself. When a shipment arrives, you want those products to go live immediately. You also want them to move to the top of your "New Arrivals" collection to maximize visibility.
- Set Inventory Triggers: Use automation to change a product's status or tags as soon as inventory levels move above zero.
- Coordinate with Marketing: Ensure that your "Back in Stock" tags sync with your email marketing flows.
- Automate Metadata: Use the scheduler to update metafields that might indicate a product is "Freshly Restocked."
Step 5: Managing Collection Visibility and Sorting
Your homepage and collection pages are your digital storefront windows. If they look the same for six months, your returning customers will get bored. However, manually re-sorting collections every week is a chore that most merchants ignore.
With the right automation, you can schedule the visibility and sorting of your collections. For example, you can schedule your "Winter Gear" collection to become invisible on March 1st and have your "Spring Collection" take its place.
- Navigate to Collection Settings: Inside the Maestro app, select the collection you want to manage.
- Set Visibility Timelines: Schedule the specific dates the collection should be published to your Online Store.
- Sort by Performance: Use automation to ensure that your best selling or newest items are always at the top of the grid.

Enhancing Your UX with Advanced Automations
Once you have the basics of catalog automation down, you can start looking at more advanced ways to enhance your website's usability. For instance, you might want to boost your store's UX and conversion rate with an optimization audit report. Automation allows you to implement the findings of such an audit at scale.
If your audit suggests that seasonal banners and specific product groupings perform better, you can schedule those changes weeks in advance. You can even automate the theme side of things by scheduling theme template changes to match your catalog updates.
The Hands-Off Store: A Proactive Step
The ultimate goal of using the Product Scheduler by Maestro is to transition from a reactive merchant to a proactive one. Instead of fixing problems as they arise, you are designing a system that prevents them.
- Consistency: Your store looks the same at 3 AM as it does at 3 PM.
- Accuracy: Automation does not get tired and does not forget a zero.
- Agility: You can pivot your entire strategy for a weekend flash sale in five minutes of setup time.
After completing these steps, you will find that your daily workload decreases significantly. This allows you to focus on high level tasks like brand building and customer acquisition.
Conclusion: Take Control of Your Time
Automating your Shopify catalog is not just a luxury: it is a vital step for any merchant looking to scale without losing their sanity. By leveraging the power of the Product Scheduler by Maestro, you can handle launches, price changes, tag management, and inventory updates with total confidence.
As a Shopify expert, I have seen these tools transform businesses from chaotic workshops into streamlined, revenue generating machines. It reduces the need for constant ecommerce maintenance services and puts the power back in your hands.
Start by automating one small thing: perhaps your next product launch or your next weekend sale. Once you see how much time you save and how much stress you eliminate, you will never want to go back to the manual way of doing things.
Ready to optimize your store further? Explore our other guides on how to perfectly set up your domain or add a custom font to your store to ensure every part of your brand is as automated and professional as your catalog.