
As a Shopify expert, I often see merchants who are essentially chained to their laptops. They are waking up at midnight to publish a new collection, manually updating stock levels from a messy spreadsheet, or frantically changing prices for a flash sale. This manual grind is the fastest way to burn out and the easiest way to make a mistake that costs you money.
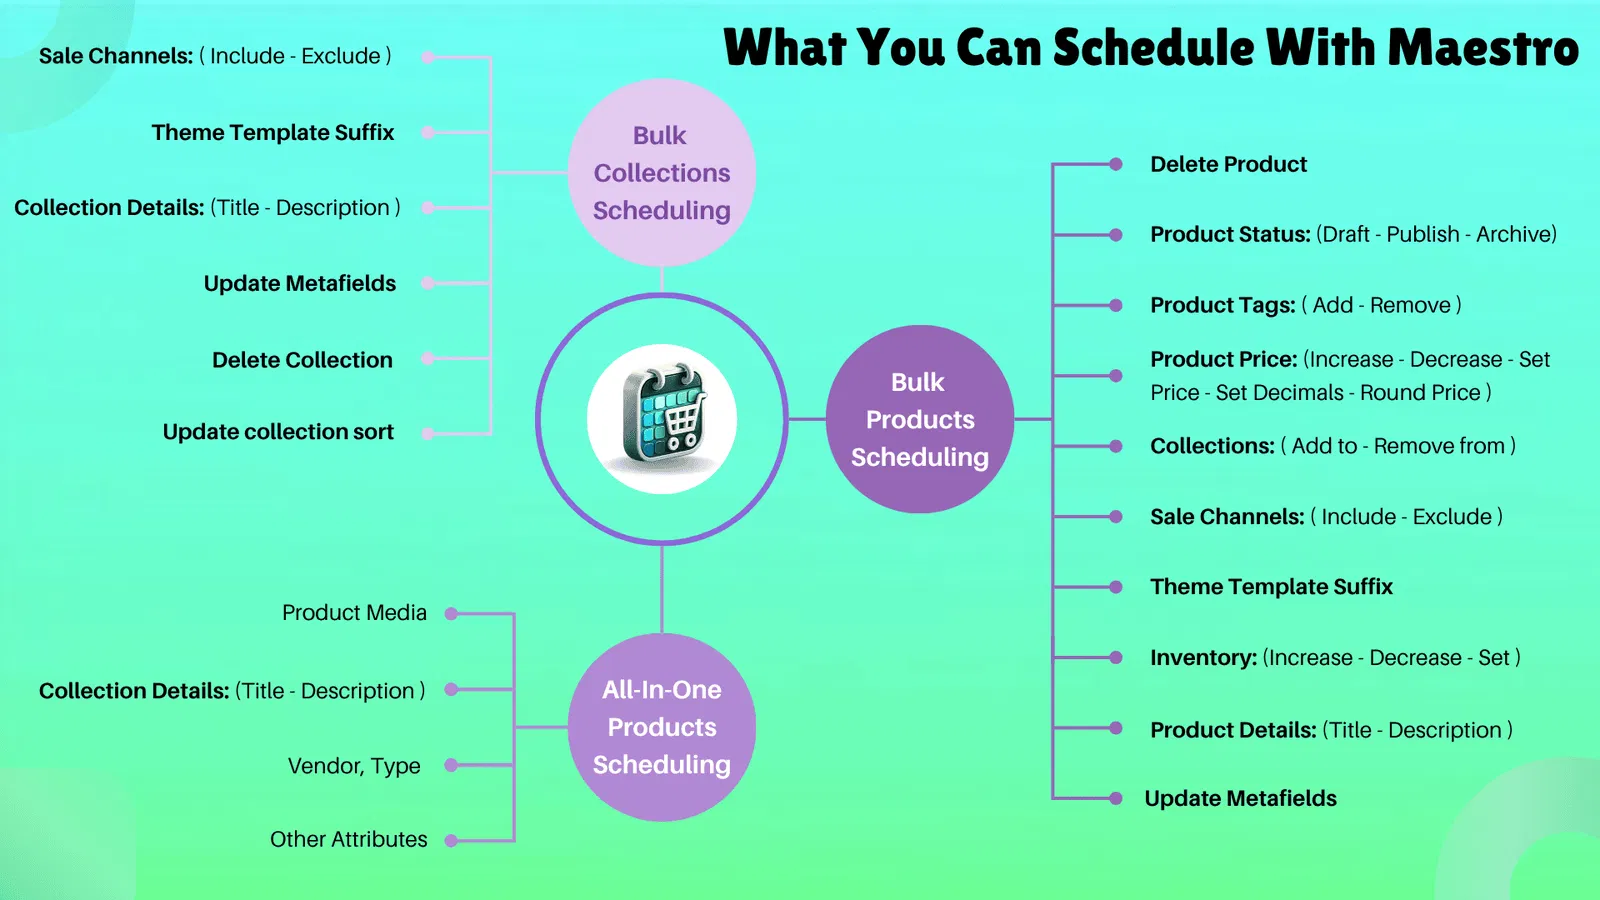
If you are seeking a way to reclaim your weekends while maintaining a high-performing store, you need to master the art of the hands-off catalog. Automating your Shopify store setup is not just about being lazy. It is about conversion rate optimization and ensuring your customer experience remains flawless even while you sleep. By leveraging tools like the Product Scheduler by Maestro app, you can transform your backend from a chaotic to-do list into a streamlined, self-managing machine.
Why You Should Automate Your Shopify Catalog
Before we dive into the how, let us look at the why. Manual store management is a bottleneck for growth. Here are the primary benefits of transitioning to an automated system:
- Eliminate Human Error: No more accidentally setting a price to $1.00 instead of $100.00.
- Recover Your Time: Spend your energy on growth strategies rather than data entry.
- Professionalism: Product launches happen exactly on time, every time, without fail.
- Scalability: An automated store can handle ten products or ten thousand products with the same level of effort.
The Draft Helper: Your Midnight Launch Savior
The most common pain point for e-commerce owners is the product launch. You have the inventory, the photos are ready, and the hype is building. But Shopify default settings often require you to manually hit "Publish" at the exact moment you want the product to go live.
The Draft Helper feature in the Product Scheduler by Maestro app changes this dynamic entirely. Instead of hovering over the publish button, you can prepare your products days or weeks in advance.
- Prepare your products: Set up your new arrivals as "Draft" status in your Shopify admin.
- Navigate to Maestro: Open the app and select the Draft Helper tool.
- Set your schedule: Choose the exact date and time you want these drafts to transition to "Active" status.
- Automate visibility: Ensure they are assigned to the correct sales channels automatically upon activation.
This approach ensures your shopify store setup remains organized and your launches are executed with surgical precision.
Mastering Inventory Automation and Restocks
Nothing kills a conversion rate faster than an "Out of Stock" badge on a product your customer just fell in love with. Conversely, selling a product that is actually out of stock is a customer service nightmare. Automated inventory management is vital for maintaining trust.
When you utilize automation for restocks, you can set rules that trigger updates based on your supplier feeds or internal logs.
- Automatic Restock Updates: Set the app to change product status from "Out of Stock" to "Active" the moment inventory levels rise above a certain threshold.
- Hide OOS Products: Automatically hide products from your storefront when they hit zero, preventing frustrated clicks and improving your conversion rate optimization.
- Buffer Stock Logic: Set rules to hide products when inventory hits 2 or 3 units to prevent overselling during high-traffic periods.
By automating these movements, you ensure your ecommerce maintenance services are working for you 24/7.

Strategic Pricing and Rounding Rules
Pricing is rarely static in e-commerce. You have seasonal sales, competitor adjustments, and cost-of-goods fluctuations. Manually updating prices for hundreds of SKUs is a recipe for a headache.
The Product Scheduler by Maestro allows you to schedule price changes in bulk. More importantly, it introduces "Rounding Rules." If you want all your sale prices to end in .99 or .95 to maintain a specific brand aesthetic, the app handles the math for you.
- Step 1: Select the products or collections that need a price adjustment.
- Step 2: Define the percentage or fixed amount increase or decrease.
- Step 3: Apply a rounding rule (e.g., round to the nearest .99).
- Step 4: Set the start and end time for these prices to be active.
This level of control is essential for professional shopify-integrations where pricing strategy is a key part of the marketing mix.
Automated Tag Management for Seasonal Sales
Tags are the invisible engine of a Shopify store. They power your filters, your automated collections, and even some of your marketing automation. However, managing them manually is tedious.
When a seasonal sale starts, you might need to add a "Summer Sale" tag to 500 items. When the sale ends, you have to remember to remove them. If you forget even ten items, your "Sale" collection looks messy and outdated.
- Identify the Trigger: Choose the products based on vendor, type, or existing tags.
- Schedule the Action: Set a time to "Add Tag" at the start of your promotion.
- Schedule the Reversal: Set a corresponding time to "Remove Tag" when the promotion ends.
This ensures that your automated collections always display the right products at the right time. It is a simple step that significantly reduces the manual workload of ecommerce maintenance.

Managing Collection Visibility and Sorting
Your homepage is your digital storefront window. You would not leave a Christmas display up in July, and you should not leave a "Winter Essentials" collection at the top of your site during a heatwave.
Automating collection visibility allows you to cycle through your marketing priorities without manual intervention.
- Scheduled Visibility: Tell Shopify exactly when a collection should appear in your navigation or on your homepage.
- Automated Sorting: Change the "Sort Order" of your collections based on the time of day or specific events. You might want "Newest Arrivals" at the top during the day and "Best Sellers" at the top during a weekend flash sale.
- Theme Integration: Coordinate these changes with your theme templates to ensure the visual style matches the content being promoted.
Simplifying the Technical Side
You do not need to be a developer to implement these hands-off strategies. While Shopify has advanced tools, apps like Maestro are designed to make these workflows accessible to everyone.
After completing the initial setup of your automation rules, your primary job shifts from "doing" to "monitoring." You can view your entire promotional calendar in a single interface, seeing exactly what is scheduled to change and when.

Conclusion: Taking the First Proactive Step
Running a successful Shopify store should not mean sacrificing your sanity. By implementing automated catalog and inventory updates, you move from being a reactive business owner to a proactive strategist.
The transition to a hands-off store setup involves:
- Implementing the Draft Helper for stress-free launches.
- Automating inventory to protect your customer experience.
- Scheduling price changes with consistent rounding rules.
- Managing tags and collections to keep your storefront fresh and relevant.
These steps are vital for anyone looking to scale. If you are ready to stop clicking and start growing, it is time to look at how automation can transform your workflow.
If you need help setting up these advanced automations or want to optimize your store for peak performance, XCO Agency is here to guide you. From migration to shopify to advanced growth strategies, we help merchants build stores that run themselves.
Ready to take your store to the next level? Book a meeting with our experts today and let us build your automated future together. Or, if you want to jump straight into the tools, check out the Maestro Product Scheduler to see how easy automation can be.