
Meta title: Advanced Shopify Flow Integration with Maestro Theme Scheduler
Meta description: Learn how to connect Shopify Flow with Maestro Theme Scheduler to automate theme publishing, campaign content, section visibility, and recurring storefront workflows.
As a Shopify expert, I often work with merchants seeking a more reliable way to coordinate promotions, product launches, and seasonal storefront updates. Manually publishing a theme or changing multiple sections at the right time may work for a small campaign, but it becomes risky as your store grows.
A missed banner, outdated promotion, or incorrectly published theme can affect customer trust and conversion rates. By combining Maestro Theme Scheduler with Shopify Flow, you can build automated workflows that connect business events with storefront changes.
This approach can help you:
- Boost campaign execution by coordinating store updates with launch dates.
- Reduce manual work across marketing, merchandising, and development teams.
- Enhance operational accuracy with automated triggers and conditions.
- Optimize custom Shopify themes for recurring promotions and content changes.
- Power-up Shopify Plus development with scalable, event-driven processes.
How Shopify Flow and Maestro Work Together
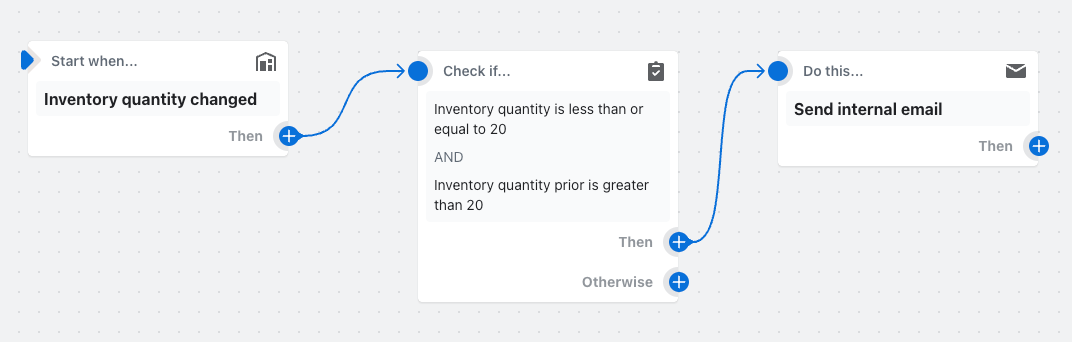
Shopify Flow uses a simple automation structure:
- Trigger: An event starts the workflow.
- Condition: Rules determine whether the workflow should continue.
- Action: Shopify or an integrated app performs the required task.
Shopify describes Flow as a platform where apps can provide custom triggers and actions. You can learn more in the official Shopify Flow development documentation.
Maestro Theme Scheduler focuses on the presentation layer of your storefront. According to its Shopify App Store listing, it can schedule:
- Full theme publishing at specific dates and times.
- Section and block visibility changes.
- Banners, images, promotional content, and slideshows.
- Recurring theme changes and content schedules.
- Updates without publishing an entire theme.
The most effective setup gives each tool a clear responsibility:
- Shopify Flow manages business logic, data conditions, and app orchestration.
- Maestro manages when storefront themes, sections, blocks, and campaign content appear.
Integration Pattern 1: Use a Native Maestro Flow Action
The simplest integration is a native Shopify Flow connector. Maestro is listed as working with Shopify Flow, but the available triggers and actions may depend on the current app version and configuration.
Before building a workflow, open Shopify Flow and check whether Maestro actions are available in the action menu. Look for actions related to theme publishing, scheduled content, section visibility, or campaign updates.
Follow these steps
-
Install Shopify Flow and Maestro Theme Scheduler
- Install Shopify Flow from the Shopify App Store.
- Install Maestro Theme Scheduler.
- Confirm that both apps have the permissions required for your workflow.
-
Prepare your storefront updates in Maestro
- Select the theme, section, or block you want to manage.
- Add the campaign content, images, banners, or promotional messaging.
- Define the start and end time.
- Use recurring schedules when the same update should appear weekly or monthly.
-
Create a Shopify Flow workflow
- Navigate to Apps > Shopify Flow in your Shopify admin.
- Select Create workflow.
- Choose an event-based or scheduled trigger.
- Add conditions that describe when the storefront change should occur.
- Select the relevant Maestro action, if available.
-
Test the workflow
- Run the workflow with a test campaign or non-critical section.
- Confirm that the correct theme or content is updated.
- Check the storefront on desktop and mobile.
- Review the Flow execution history for errors.
This structure is useful when the required Maestro action is visible directly inside Flow. It keeps the workflow readable and avoids unnecessary custom development.
Integration Pattern 2: Trigger Storefront Changes from Campaign Data
Many growing brands already use product tags, collections, metafields, or campaign records to manage merchandising. You can use these data points as the decision layer for automated storefront updates.
For example, create a campaign metafield that stores:
- Campaign name
- Campaign status
- Start date and time
- End date and time
- Regional market
- Target collection
- Preferred storefront experience
Then build a Flow workflow that evaluates this information before activating the corresponding storefront change.
Example workflow logic
Trigger: A campaign status changes to “Ready”.
Condition:
- The campaign start date is valid.
- The target collection contains products.
- Inventory is available.
- The campaign has been approved by the merchandising team.
Action:
- Trigger the relevant Maestro action, if available.
- Notify the marketing team.
- Add a campaign tag or update a tracking metafield.
- Send an internal email confirming the workflow execution.
This process helps prevent a theme change from going live before the campaign is ready. It also creates a clearer audit trail for teams managing multiple storefront updates.

Integration Pattern 3: Use Scheduled Triggers for Time-Sensitive Campaigns
Shopify Flow can also be used with scheduled workflows. This is helpful when a campaign should begin or end at a precise time rather than after a product or order event.
Consider a weekend promotion that starts at 9:00 a.m. on Friday and ends at midnight on Sunday.
Step 1: Create the campaign schedule
Use Maestro to prepare the relevant theme or content updates.
- Schedule the promotional homepage banner.
- Show a sale announcement bar.
- Display a campaign-specific slideshow.
- Hide standard merchandising sections.
- Schedule the return to the regular storefront experience.
Step 2: Configure the Flow trigger
Select a scheduled trigger in Shopify Flow and set it to run shortly before the campaign begins.
Using a small buffer gives your team time to receive a notification and verify that the workflow has completed before customers arrive.
Step 3: Add campaign conditions
Add conditions such as:
- Campaign status equals approved.
- The current date is within the campaign window.
- Inventory for the promoted collection is above the minimum threshold.
- The store is operating in the intended market.
Step 4: Add the action
Select the available Maestro action. If a native action is not available for your specific use case, consult the app documentation or your development team before using a custom integration.
Do not assume that Maestro has a public API or that every workflow can be triggered through an HTTP request. For a custom connection, use only a documented endpoint, webhook, or integration method.
Step 5: Add notifications and safeguards
After the Maestro action, add an internal notification.
- Send an email or Slack message to the operations team.
- Include the campaign name and execution time.
- Record the workflow result in a metafield or external reporting system.
- Create an escalation process for failed executions.

Build Flow Workflows for Custom Shopify Themes
Advanced automation depends on a stable theme architecture. If your custom Shopify themes use inconsistent section names, hardcoded campaign content, or unpredictable settings, automation becomes more difficult to manage.
When developing or customizing a theme, follow these practices:
-
Use clear section and block naming
- Give each promotional component a descriptive name.
- Keep naming consistent across development, staging, and production themes.
-
Make campaign content configurable
- Use theme settings, metafields, or dynamic sources instead of hardcoding every message.
- Make it easy for merchants to update copy, images, links, and product references.
-
Separate campaign components
- Build promotional bars, banners, product grids, and countdown areas as independent sections.
- This makes it easier to schedule one component without changing the entire theme.
-
Protect the primary storefront
- Test scheduled changes in a duplicate theme before publishing.
- Keep a known-good version available for rollback.
- Avoid making multiple unrelated theme changes inside one automation.
-
Account for time zones
- Confirm the Shopify store time zone.
- Align Flow schedules, Maestro schedules, marketing calendars, and team notifications.
- Document the time zone in every major campaign plan.
For more support with theme architecture and storefront improvements, explore XCO Agency’s Shopify design services.
Example: Automated Black Friday Storefront Workflow
Here is a practical workflow for a Black Friday campaign.
| Workflow stage | Shopify Flow responsibility | Maestro responsibility | Safeguard |
|---|---|---|---|
| Campaign preparation | Check that the campaign is approved | Prepare theme and content schedules | Require an approval status |
| Campaign launch | Run at the scheduled time | Publish the campaign theme or show selected sections | Send a launch notification |
| Inventory monitoring | Check stock or product conditions | Keep campaign content visible while eligible | Stop or adjust when inventory is low |
| Campaign ending | Run the closing workflow | Restore the standard theme and hide sale sections | Confirm the storefront is reverted |
| Post-campaign review | Record execution results | Review publishing history | Document errors and improvements |
Implement the workflow
-
Create a duplicate campaign theme.
- Add Black Friday graphics, promotional sections, and collection merchandising.
- Preview the theme on mobile and desktop.
-
Configure Maestro schedules.
- Set the launch date and time.
- Add recurring schedules if the promotion has daily variations.
- Schedule the end-of-campaign changes.
-
Create the Flow trigger.
- Use a scheduled time trigger or an approved campaign status event.
- Select the relevant store or campaign data.
-
Add conditions.
- Verify that the campaign is approved.
- Check that target products are published.
- Confirm that inventory is sufficient.
-
Add the Maestro action or documented integration.
- Apply the campaign change.
- Avoid publishing unrelated theme updates.
-
Add notifications.
- Notify marketing when the campaign starts.
- Notify operations when it ends.
- Escalate failed workflows immediately.
-
Review the execution history.
- Check whether every step completed.
- Confirm the storefront reflects the intended customer experience.
- Record the results for future campaigns.

Best Practices for Reliable Automation
Before activating an advanced workflow, use this checklist:
-
Define one source of truth
- Decide whether campaign timing lives in Maestro, Shopify Flow, or your campaign management system.
- Avoid maintaining conflicting dates in multiple places.
-
Use clear workflow names
- Include the campaign, market, environment, and action.
- Example:
BF2026-US-Launch-CampaignTheme.
-
Start with one storefront change
- Test a banner or announcement bar before automating a full theme publish.
- Expand the workflow after confirming reliable execution.
-
Plan for failure
- Add notifications for failed actions.
- Keep a rollback theme ready.
- Give team members permission to manually correct a storefront issue.
-
Review app and platform updates
- Flow connectors and app actions can evolve.
- Re-test critical workflows after changes to Shopify, Maestro, or your custom Shopify themes.
For complex requirements involving multiple systems, XCO Agency can help with Shopify integration services, custom API planning, and Shopify Plus development.
Final Thoughts
Connecting Shopify Flow with Maestro Theme Scheduler is a proactive step toward more reliable storefront operations. Flow can evaluate business events and conditions, while Maestro can coordinate the visual experience across themes, sections, blocks, banners, and promotional content.
The key is to begin with a clear workflow design:
- Define the trigger.
- Add the right conditions.
- Select the documented action.
- Test the experience.
- Monitor the result.
- Keep a reliable fallback.
For merchants running frequent promotions or managing high-volume stores, this is a vital step toward reducing manual work and protecting campaign accuracy. Install Maestro Theme Scheduler to start automating your storefront, or book a consultation with XCO Agency to plan a more advanced Shopify Plus development and automation strategy.